
Angular Elements Guide
It is exciting to finally see the adoption of web components going mainstream. There are many tools available for building them, but none can match the power and stability of Angular Elements. The following lesson will provide a handful of useful techniques aimed at building complex production-ready custom elements.
In addition to this post, check out these resources:
- Manfred Steyer’s Angular Elements Series
- Sam Julian’s Getting Started with Angular Elements
- Nrwl’s Five Reasons to Use Angular Elements
- Angular Elements QuickStart
Rendering without Zone.JS
After much experimentation, I’ve come to the conclusion that Zone.JS is not the the ideal way to handle change detection with Angular Elements. Automatic change detection is awesome when working in the context of an Angular app, but when you decouple your Angular components as custom elements you can run into hard-to-debug issues that only seem to happen in production. The Angular team has several open issues to address these bugs, but I think moving away from zones is a smart move in general. You will need to manually tell Angular when to re-render your components (see next sections), but this actually makes your code more explicit and easier to understand.
First, let’s turn off zones globally in the main.ts file.
// omitted ...
platformBrowserDynamic().bootstrapModule(AppModule, { ngZone: 'noop'})
You can also turn zones off at the component level by setting the OnPush strategy.
@Component({
  // ...
  changeDetection: ChangeDetectionStrategy.OnPush,
})
Component State
Now that zones are switched off, we need Angular to render the component when its internal data changes The general idea here is not novel and is similar conceptually in React, Flutter, and Stencil - i.e one way data flow. We have a state object that when changed with the setState(key, value) method tells the component to render - simple.
import { Component, ChangeDetectorRef } from '@angular/core';

@Component(...)
export class ImgLazyComponent {

 // Only modify with setState
  state = {
    visible: false,
    loaded: false
  };

  constructor(private cd: ChangeDetectorRef) {}

  private setState(key, value) {
    this.state = { ...this.state, [key]: value };
    this.cd.detectChanges();
  }

  // Usage
  show() {
    this.setState('visible', true);
  }
}
Keep in mind, there are many ways you could implement this code. The only secret sauce is the call to this.cd.detectChanges().
Shared Global State
One of the ways Angular Elements stands out is its ability to share data and functionality between components via dependency injection.
ng g service shared
To run change detection in a shared service, we reference the entire application, then call tick whenever an shared value changes.
import { Injectable, ApplicationRef } from '@angular/core';

@Injectable()
export class CoolService {
  state = 0;

  constructor(private app: ApplicationRef) {}

  setState() {
    this.state = Math.random();

    // Run change detection
    this.app.tick();
  }
}
Page Load Performance
One of the main criticisms of Angular Elements has been the bundle size, which is around 60Kb for a gzipped hello world. (1) The bundle size will decrease significantly when Ivy lands in the near future. (2) You’re getting the full power of Angular in that bundle, and (3) it does not have a significant impact on perf when you defer the script.
When you defer a script tag <script defer src="elements.js"> it tells the browser to render the HTML first, then load the script - i.e no render blocking. This is crucial for static websites the use components because your top priority is getting the main content painted. After the first meaningful paint, your web components can kick in to add interactivity.
The tests below were run with a bundle containing both Angular and Firebase at a weight of 350Kb.
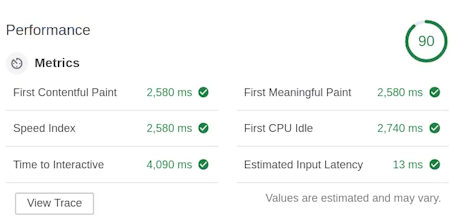
Angular elements page load unoptimized
Notice how we’re getting a page load of 600ms ⚡ - 4x faster - and a near perfect performance score. That is awesome considering how much horsepower we have under the hood.
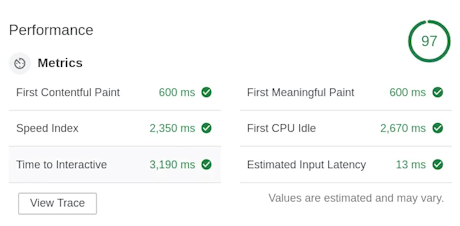
Page load performance increase by deferring the script
Register Multiple Custom Elements
In most projects, you will have more than one component and it is cumbersome to register them one-by-one. I prefer to create an array of arrays (or tuples if you will) with the config for each element, then register them in a loop.
export class AppModule {
  constructor(private injector: Injector) {

    const elements: any[] = [
      [ImgLazyComponent, 'img-lazy'],
      [ImgFirebaseComponent, 'img-firebase'],
      [MyBtnComponent, 'my-btn']
    ];

    for (const [component, name] of elements) {
      const el = createCustomElement(component, { injector: this.injector });
      customElements.define(name, el);
    }
  }

  ngDoBootstrap() {}
}
Exposing Public Methods
A beautiful thing about web components is that we can interact with them using vanilla JS (or within other frameworks). By default, your internal code will not be accessible to the outside world, for example:
document.querySelector('my-element').cool();
// undefined
But it can be useful to allow non-angular code to control your elements. Methods and properties can be exposed using the @Input decorator. One caveat is that in order to give your element the proper this context, you need make public methods a function property like so:
  @Input()
  notCool() { console.log(this.state) }
  // this == undefined


  @Input()
  cool = () => console.log(this.state)
  // this == ComponentInstance
Exposing Public Events
You might also want to listen to the the custom events emitted by your component, for example:
document.querySelector('my-element').addEventListener('my-custom-event', (e) => doSomething)
We can make this happen by dispatching a CustomEvent in the browser alongside an Angular Output/EventEmitter combo.
@Component(...)
export class ImgLazyComponent {

  @Output() coolEvent = new EventEmitter();

  constructor(private el: ElementRef) {}

  private customEmit(val) {
    this.coolEvent.emit(val);
    const domEvent = new CustomEvent('cool-event');
    this.el.nativeElement.dispatchEvent(domEvent);
  }

  doSomething() {
    this.customEmit('did something');
  }
}
Content Projection and Shadow DOM
One cannot just embed HTML inside a custom element. Currently, if you try to transclude some markup in your web component it will be removed.
<my-element>

  <!-- You won't see this -->
  <h1>Howdy, Partner</h1>

</my-element>
You can save your end users the hassle of adding their own custom markup by projecting content into slots. This feature requires the Shadow DOM to be enabled in your component.
@Component({
  // ...
  encapsulation: ViewEncapsulation.ShadowDom
})
Now you can add slots to your component markup.
Default Slot
If you only have one place for the user to project markup, you can simply add a default slot.
<!-- Component HTML -->
<img src="...">
<slot></slot>
Now HTML can be included inside the component and will be rendered below the image.
<!-- Usage -->
<my-element>
  <h1>My Cool Image</h1>
</my-element>
Named Slots
<!-- Component HTML -->
<h1><slot name="header">Default Header</slot></h1>
<p><slot name="caption">Default Caption</slot></p>
Now the end user of the web component can just pass a span that references the slot name and it will be rendered in the matching location.
<!-- Usage -->
<my-element>
  <span slot="caption">I ❤️ Web Components</span>
  <span slot="header">My Custom Header</span>
</my-element>
Using Angular Elements outside of Angular
At this point we have a working custom element, but how do we use it outside of our Angular CLI project? The answer is simple… We just need to export the JavaScript.
Currently, running ng build --prod will generate three separate bundles for the app - main, polyfills, and inline. All we need to do is concatenate these files into a single script.
Lastly, let’s add two build commands in package.json. The first script called concat:scripts, it will take our three JS packages and merge it into a single file in the elements directory. Cool, huh?! Then will use the previous one after the build is complete.
"scripts": {
  "concat:bundles": "cat dist/{inline,polyfills,main}.bundle.js > elements/user-poll.js",
  "build:elements": "ng build --prod --output-hashing false && npm run concat:bundles",
}
Run npm run build:elements and you’re done! Use for your Angular Elements component on any web app.
<user-poll></user-poll>
<script src="path/to/user-poll.js"></script>
Elements will allow Angular to penetrate a much larger category of web applications because it no longer needs to take over the entire DOM. Developers can build single-purpose components and drop them into any existing web application. This is huge! I’m really excited to see this area of Angular evolve in the near future.