
Upload Multiple Files to Firebase Storage with Angular
Firebase makes it easy to upload a huge payload of raw files a cloud storage bucket. The following lesson will teach you how to upload files to Firebase Storage with Angular, including several advanced concepts about how to…
- Handle multiple simultaneous concurrent file uploads.
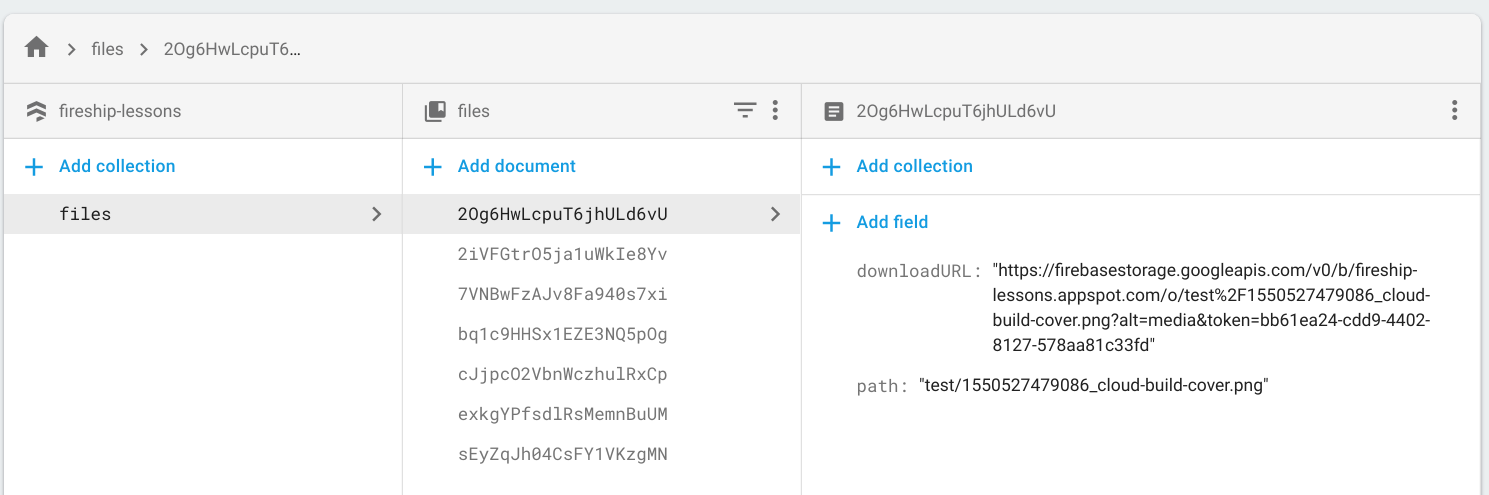
- Save the resulting download URL to Firestore.
- Display a progress bar and provide UI controls to pause, cancel, and resume uploads.
This post first appeared as Episode 82 on AngularFirebase.com and has been updated to handle multiple files and save additional data to Firestore.
The demo video below demonstrates how the complete feature should work after completing this lesson.
Step 0 - Prerequisites
- Install AngularFire
ng add @angular/fire
Base CSS Styles
Below you will find the base CSS styles for a basic dropzone.
.dropzone {
  display: flex;
  align-items: center;
  justify-content: center;
  flex-direction: column;
  min-width: 80vw;
  font-weight: 200;
  height: 300px;
  border: 2px dashed #f16624;
  border-radius: 5px;
  background: white;
  margin: 10px 0;

  &.hovering {
      border: 2px solid #f16624;
      color: #dadada !important;
  }

  .file-label {
      font-size: 1.2em;
  }
}

progress::-webkit-progress-value {
  transition: width 0.1s ease;
}
Step 1 - Directive to Receive Files from the Browser
Want to skip this step? Consider using this zero-dependency file-drop web component developed by Google Chrome Labs
The first step is to create a directive that can receive the files from the browser. The directive customize the Drag and Drop API to meet the specific needs of our feature.
ng g directive dropzone
Emit Files as a Custom Event
The most important aspect of the directive below is that it listens to the drop event on the parent element. This event contains the FileList that the user wants to upload. This data is emitted up as a custom event so it can be used by our Uploader component in the next step.
In addition, we listen to dragover/dragleave events so we can toggle CSS styles when the user is hovering over the dropzone.
import { Directive, HostListener, Output, EventEmitter } from '@angular/core';

@Directive({
  selector: '[dropzone]'
})
export class DropzoneDirective {

  @Output() dropped =  new EventEmitter<FileList>();
  @Output() hovered =  new EventEmitter<boolean>();

  @HostListener('drop', ['$event'])
  onDrop($event) {
    $event.preventDefault();
    this.dropped.emit($event.dataTransfer.files);
    this.hovered.emit(false);
  }

  @HostListener('dragover', ['$event'])
  onDragOver($event) {
    $event.preventDefault();
    this.hovered.emit(true);
  }

  @HostListener('dragleave', ['$event'])
  onDragLeave($event) {
    $event.preventDefault();
    this.hovered.emit(false);
  }
}
Step 2 - Uploader Component
The next step is put our directive to use in a component that will receive the files and loop over them. This component does not use Firebase directly, but rather it manages the files dropped by the user and renders an upload-task (which we will build in step 3) component for each file.
ng g component uploader
Listen to File Drop
The HTML we add the dropzone directive to a div and listen the custom events that it emits. In addition, we loop over a list of files and render upload-task which will be created in the next step.
<div class="dropzone"
dropzone
(hovered)="toggleHover($event)"
(dropped)="onDrop($event)"
[class.hovering]="isHovering">
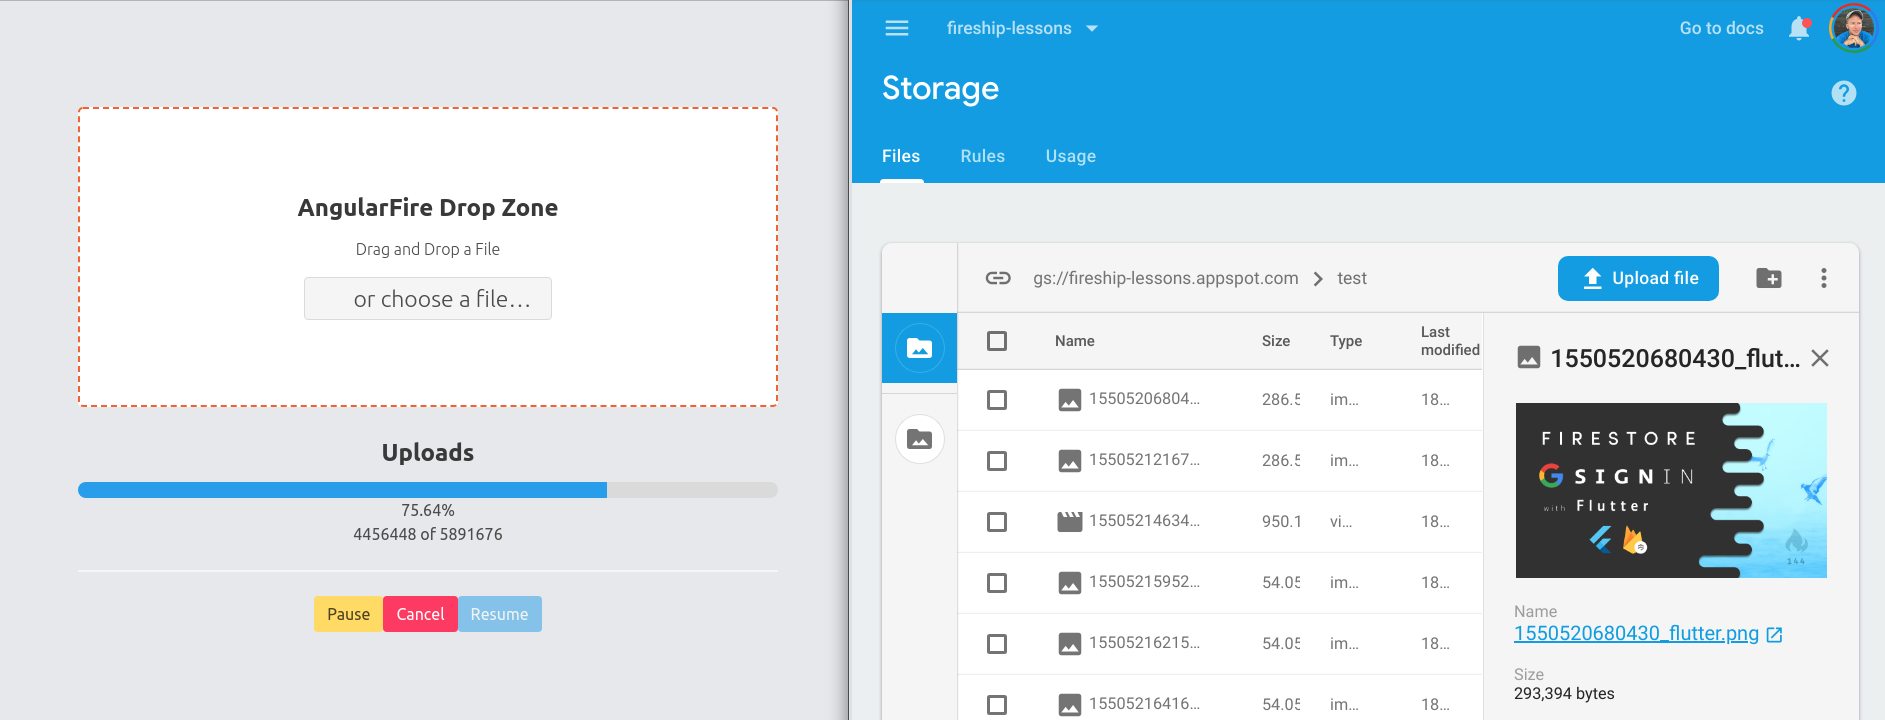
<h3>AngularFire Drop Zone</h3>
<p>Drag and Drop a File</p>
</div>
<h3>Uploads</h3>
<div *ngFor="let file of files">
<upload-task [file]="file"></upload-task>
</div>
The component typescript is very simple - it just takes the FileList dropped on the div and pushes it to an array.
import { Component } from '@angular/core';

@Component({
  selector: 'uploader',
  templateUrl: './uploader.component.html',
  styleUrls: ['./uploader.component.scss']
})
export class UploaderComponent {

  isHovering: boolean;

  files: File[] = [];

  toggleHover(event: boolean) {
    this.isHovering = event;
  }

  onDrop(files: FileList) {
    for (let i = 0; i < files.length; i++) {
      this.files.push(files.item(i));
    }
  }
}
Step 3 - Upload Task Component
ng g component upload-task
Each child component is a self contained UploadTask that will start running as soon as the component is initialized. It will display the upload progress in realtime and save the download URL in firestore when it completes.
There is no hard limit on the number of files you can send to Firebase simultaneously. The SDK will attempt to use the most efficient strategy available to transfer them to the cloud, which is mostly dependent on the user’s network connection.
Show Progress and Provide User Controls
The HTML provides a progress bar and several buttons that allow the user to pause, cancel, or resume an individual upload.
<div *ngIf="percentage | async as pct">
  <progress [value]="pct" max="100"></progress>
  {{ pct | number }}%
</div>


<div *ngIf="snapshot | async as snap">

  {{ snap.bytesTransferred }} of {{ snap.totalBytes }}

  <div *ngIf="downloadURL as url">
    <h3>Results!</h3>
    <img [src]="url"><br>
    <a [href]="url" target="_blank" rel="noopener">Download Me!</a>
  </div>

  <button (click)="task.pause()" [disabled]="!isActive(snap)">Pause</button>
  <button (click)="task.cancel()" [disabled]="!isActive(snap)">Cancel</button>
  <button (click)="task.resume()" [disabled]="!(snap?.state === 'paused')">Resume</button>
</div>
The component is responsible for managing the state of the upload. In this demo, the upload starts transferring data when initialized with ngOnInit. It takes the file as an input property, then uses it’s name as a reference in the storage bucket. Keep in mind, storage path names must be unique (just like any filesystem), so we also add a timestamp to the name to ensure uniqueness on each upload.
The snapshotChanges Observable emits data every few hundred milliseconds with information about the upload’s progress. You can use it for progress indicators or alternatively use percentageChanges to listen the current progress ranging from 0 to 100.
We can detect when the upload has finished using the RxJS finalize operator. At this point, we can fetch the public download URL and save it to Firestore for easy access in the future.
import { Component, OnInit, Input, ChangeDetectorRef } from '@angular/core';
import { AngularFireStorage, AngularFireUploadTask } from '@angular/fire/storage';
import { AngularFirestore } from '@angular/fire/firestore';
import { Observable } from 'rxjs';
import { finalize, tap } from 'rxjs/operators';

@Component({
  selector: 'upload-task',
  templateUrl: './upload-task.component.html',
  styleUrls: ['./upload-task.component.scss']
})
export class UploadTaskComponent implements OnInit {

  @Input() file: File;

  task: AngularFireUploadTask;

  percentage: Observable<number>;
  snapshot: Observable<any>;
  downloadURL: string;

  constructor(private storage: AngularFireStorage, private db: AngularFirestore) { }

  ngOnInit() {
    this.startUpload();
  }

  startUpload() {

    // The storage path
    const path = `test/${Date.now()}_${this.file.name}`;

    // Reference to storage bucket
    const ref = this.storage.ref(path);

    // The main task
    this.task = this.storage.upload(path, this.file);

    // Progress monitoring
    this.percentage = this.task.percentageChanges();

    this.snapshot   = this.task.snapshotChanges().pipe(
      tap(console.log),
      // The file's download URL
      finalize( async() =>  {
        this.downloadURL = await ref.getDownloadURL().toPromise();

        this.db.collection('files').add( { downloadURL: this.downloadURL, path });
      }),
    );
  }

  isActive(snapshot) {
    return snapshot.state === 'running' && snapshot.bytesTransferred < snapshot.totalBytes;
  }

}
The final result should look something like this: