
Angular NgRx Starter Guide
The Redux JavaScript library was made famous by React and Elm, but its design patterns can also be applied in Angular. The general idea is that all application data is kept in a single JavaScript object on the client, giving you a predictable tree of state changes (we’ll get into this later). In this lesson, we are going to build a simple NgRx Angular app from scratch, that will eventually become this NgRx-Fire demo app.
Redux Pattern Basics
Before we start writing any code, let’s talk about the main design patterns of Redux powered JavaScript apps.
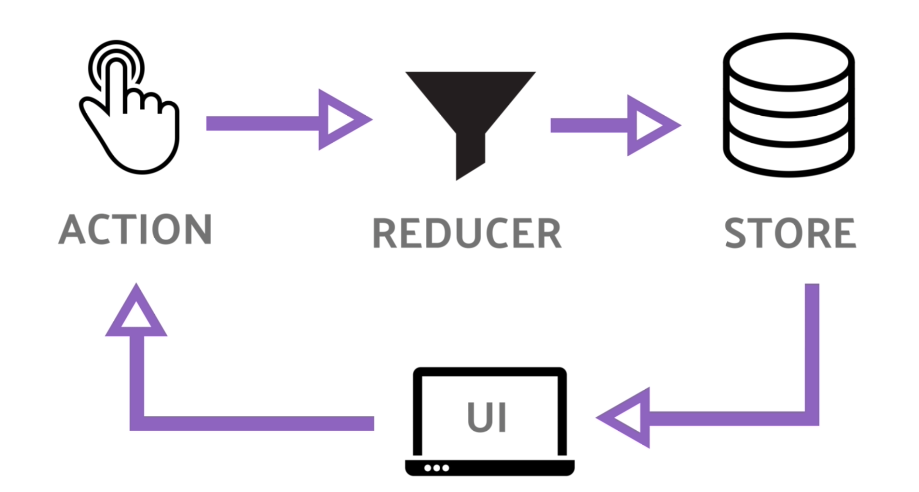
A diagram of how data flows in Redux with Angular NgRx
Top Five High-Level Concepts
Here are five must-know high-level concepts about ngrx/Redux.
- All application data is one single object known as a store, representing the application’s state. I like to think of the store as a mini client-side database that holds all data being consumed by an app at any given point in time.
- A state object cannot be changed - it is immutable.
- When data changes, the existing state is duplicated, then a new object is created with the updates. In Angular this data is treated as an RxJS Observable, allowing us to subscribe to it from anywhere in the app.
- State can only be changed via an action, which is also an object. It includes a type (the action name) and an optional payload (the action data), for example
{ type: 'DELETE_ITEM', payload: 123 }. - When an event is emitted, for example a button click, the action is sent to a reducer function to converts the old state into the new state.
What are the benefits of Redux?
- Global Data: The Redux pattern allows you to observe the current data state from anywhere in the app.
- Debugging: Because you have a sequence of state changes, you debug redux apps by comparing one state to another. This gives you a time lapse breakdown of your data.
- Isolation of Data: Data flows one-way and is completely isolated from presentation.
- Type Safety: TypeScript and Redux go together like rainbows and unicorns. Redux gives you good incentive to take advantage strong typing, which will result in better tooling and maintainability.
What about the drawbacks?
- More Code/Learning Curve: Maintaining an immutable data store simply results in more code. I would not consider the learning curve very steep, but it is a whole new set of ideas to wrap your head around.
- Decreased Flexibility: Integrating the Redux pattern with 3rd party packages can be difficult. You need to build your own declarative interface for application data that is altered by external libraries.
- Potential Performance Issues: There are some cases when it is not performant to mount a single data store on the client. Imagine a large state object that needs to be copied after an event that fires every 5ms - that’s going to weigh you down at some point.
What is ngrx?
The ngrx library brings Redux patterns to Angular using RxJS. It is modularized into several different packages. In this lesson, we will be focused on…
@ngrx/store - Handles the main Redux state data store. @ngrx/store-devtools - Enables debugging with Chrome Redux plugin
Setting up ngrx in Angular
Let’s start with a brand new app with the Angular CLI. I’m naming it ngrxFire because we will be adding realtime data via Firebase to this app in the next lesson.
ng new ngrxFire --routing
cd ngrxFire
Then install @ngrx/store via NPM.
npm install @ngrx/core @ngrx/store --save
The Most Simple Ngrx Example
Let’s start by building the most simple ngrx pattern possible. Our app state will consist of one single variable - a hello world message in English. Then we will create two actions that will translate this message into French or Spanish.

app.module.ts
When importing the StoreModule the object you pass to it is important. In this case we give it a key of state (you can call it whatever you want), which will be referenced in the component.
/// ...omitted
import { StoreModule } from '@ngrx/store';
import { simpleReducer } from './simple.reducer';

@NgModule({
  declarations: [
    AppComponent
  ],
  imports: [
    BrowserModule,
    AppRoutingModule,
    StoreModule.forRoot({ message: simpleReducer })
  ],
  bootstrap: [AppComponent]
})
export class AppModule { }
simple.reducer.ts
Now let’s create the reducer in a new file called src/app/simple.reducer.ts.
It is conventional to give action names all caps in redux, such as `const SOME_ACTION = 'SOME_ACTION'`
The reducer is just a function that runs a switch statement over possible actions that uses the old state to create a new state. Here we have two actions SPANISH and FRENCH. If the reducer receives one of these actions, it simply converts the state string to a new value.
Side Note: I apologize for the for screwed-up syntax highlighting of the switch statement.
import { Action } from '@ngrx/store';

export function simpleReducer(state: string = 'Hello World', action: Action) {

  switch (action.type) {

		case 'SPANISH':
		  return state = 'Hola Mundo'

    case 'FRENCH':
      return state = 'Bonjour le monde'

		default:
			return state;
	}
}
app.component.ts
Now we need a way to present and change the state in the UI. Here are a few key points about this code.
- When using the ngrx
Storeclass, it is necessary to give it a TypeScript interface that cooresponds the object we passed to the NgModule. In this example, ourAppStateinterface handles this task with it’s onemessageproperty. - A variable for
message$is set as an Observable on the component by callingthis.store.select('message'). - We trigger state changes by sending actions to the reducer with
this.store.dispatch('ACTION')
import { Component } from '@angular/core';

import { Store } from '@ngrx/store';
import { Observable } from 'rxjs/Observable';

interface AppState {
  message: string;
}

@Component({
  selector: 'app-root',
  templateUrl: './app.component.html',
  styleUrls: ['./app.component.scss']
})
export class AppComponent {

  message$: Observable<string>

  constructor(private store: Store<AppState>) {
    this.message$ = this.store.select('message')
  }

  spanishMessage() {
    this.store.dispatch({type: 'SPANISH'})
  }

  frenchMessage() {
    this.store.dispatch({type: 'FRENCH'})
  }
}
Now we can subscribe to the Observable in the HTML and trigger changes with button click events.
<h2>{{ message$ | async }}</h2>

<button (click)="spanishMessage()">Spanish</button>
<button (click)="frenchMessage()">French</button>
A More Advanced Example
Let’s build on this simple reducer with something more complex. Our goals include,
- Manage state as an Object with four different actions
- Send a data payload with actions.
- Organize code into a modular structure.
redux state log
Let’s create some new directories to organize our reducers, actions, and models.
You may want to organize your reducers, actions, and models based the feature they belong to. For example, you could nest these files in directory called `/posts`. Since we're only working in the app component, we are putting everything in the app directory for now.
Your file structure should look like this:
app/
  actions/
    post.actions.ts
  models/
    post.model.ts
  reducers/
    post.reducer.ts
app.module.ts
Update the app module with the post reducer.
import { postReducer } from './reducers/post.reducer';

@NgModule({
  declarations: [
    AppComponent
  ],
  imports: [
    BrowserModule,
    AppRoutingModule,
    StoreModule.forRoot({
      post: postReducer, /// <--- add reducer here
      message: simpleReducer
    })
  ],
  bootstrap: [AppComponent]
})
post.model.ts
Let’s model our post data with a TypeScript interface.
export interface Post {
  text: string;
  likes: number;
}
post.actions.ts
Every action will be managed within it’s own class. This makes it possible to use a constructor to send a data payload when a new action instance is created. A key benefit of this approach is that it allows you to strong type the data that is sent with a given action’s payload.
import { Action } from '@ngrx/store';

export const EDIT_TEXT  = '[Post] Edit';
export const UPVOTE     = '[Post] Upvote';
export const DOWNVOTE   = '[Post] Downvote';
export const RESET      = '[Post] Reset';


export class EditText implements Action {
  readonly type = EDIT_TEXT;

  /// user a constructor to send a payload with the action
  constructor(public payload: string) {}
}


export class Upvote implements Action {
  readonly type = UPVOTE;
}

export class Downvote implements Action {
  readonly type = DOWNVOTE;
}

export class Reset implements Action {
  readonly type = RESET;
}

export type All
  = Upvote
  | Downvote
  | Reset
  | EditText;
post.reducer.ts
Remember, in Redux the state is immutable, so we always need to create a new object when the state changes. A reliable way of doing this is via Object.assign({}, state, newData), which builds a new object from left to right. In other words, the arguments on the right will overwrite the properties existing from the arguments on the left.
import * as PostActions from '../actions/post.actions';
import { Post }         from '../models/post.model'

export type Action = PostActions.All;

/// Default app state
const defaultState: Post = {
  text: 'Hello. I am the default post',
  likes: 0
}

/// Helper function to create new state object
const newState = (state, newData) => {
  return Object.assign({}, state, newData)
}


/// Reducer function
export function postReducer(state: Post = defaultState, action: Action) {
  console.log(action.type, state)

	switch (action.type) {
  		case PostActions.EDIT_TEXT:
  			return newState(state, { text: action.payload });

      case PostActions.UPVOTE:
        return newState(state, { likes: state.likes + 1 });

  		case PostActions.DOWNVOTE:
  			return newState(state, { likes: state.likes - 1 });

  		case PostActions.RESET:
  			return defaultState;

  		default:
  			return state;

	}
}
app.component.ts
In the app component, we can update the AppState interface and tell the ngrx store to select the post property.
Notice how the dispatch calls are now being made by instantiating action objects. In the PostActions.EditText we can pass data to the constructor as the payload the gets processed by the reducer function.
import { Component } from '@angular/core';

import { Store } from '@ngrx/store';
import { Observable } from 'rxjs/Observable';

import { Post } from './models/post.model';
import * as PostActions from './actions/post.actions';


interface AppState {
  post: Post;
}

@Component({
  selector: 'app-root',
  templateUrl: './app.component.html',
  styleUrls: ['./app.component.scss']
})
export class AppComponent {

  post: Observable<Post>

  text: string; /// form input val

  constructor(private store: Store<AppState>) {
    this.post = this.store.select('post')
  }

  editText() {
    this.store.dispatch(new PostActions.EditText(this.text) )
  }

  resetPost() {
    this.store.dispatch(new PostActions.Reset())
  }

  upvote() {
    this.store.dispatch(new PostActions.Upvote())
  }

  downvote() {
    this.store.dispatch(new PostActions.Downvote())
  }
}
app.component.html
In the HTML, we subscribe to the post Observable and connect our event handlers to buttons.
<div *ngIf="post | async as p">


  <h2>{{ p.text }}</h2>
  <h4>Votes: {{ p.likes }}</h4>

  <button (click)="upvote()">Upvote</button>
  <button (click)="downvote()">Downvote</button>
  <button (click)="resetPost()">Reset</button>

  <input [(ngModel)]="text">
  <button (click)="editText()" >Change Title</button>

</div>
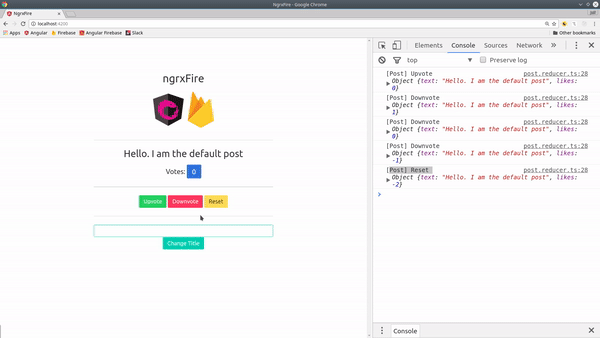
Debugging with Redux DevTools for Chrome
As I mentioned previously, debugging is one of the main benefits of the Redux pattern. Ngrx has a special package that can supercharge Redux debugging in the Chrome browser.
First, install the Redux DevTools chrome plugin.
Next, run:
npm install @ngrx/store-devtools --save
Then update your app module.
import { StoreDevtoolsModule } from '@ngrx/store-devtools';

@NgModule({
  imports: [
    StoreModule.forRoot({ post: postReducer }),
    StoreDevtoolsModule.instrument({
      maxAge: 10 // number of states to retain
    })
  ]
})
export class AppModule { }
When you activate the plugin in Chrome, you get nice breakdown of state changes in browser. The plugin will tell you exactly which properties have changed after each event. This makes debugging incredibly easy when get unexpected results in your data store.

The redux plugin for Chrome makes debugging NgRx a breeze
Up next
That’s it for the basics of ngrx/store. In the next lesson, I will introduce the ngrx/effects library to handle realtime asynchronous Firebase data.