
In App Purchases in Flutter
Flutter recently launched official support for In App Purchases (IAP) and provides a unified plugin for both iOS and Android. Native mobile apps that collect payments for digital goods on the Apple App Store and/or Google Play Store are typically required to use the In App Purchases API, which means services like Stripe and Paypal are out of the question (with the exception of payments for physically shipped goods). In reality, In App Purchases are far more lucrative for digital products, with the game Candy Crush generating $4MM in revenue per day in 2018. The following lesson will show you how to get started with the in_app_purchase plugin to accept payments, microtransactions, and subscriptions from both stores.
Demo of a consumable In App Purchase in Flutter on the Google Play Store
Product Types
In App Purchases between Apple and Google are nearly identical, but you will find some minor differences in the code. This tutorial uses a managed consumable product, which represents an item that can be purchased multiple times, like the useless gems/coins/tokens 💎 you can buy in many mobile games.
- Managed (consumable). Multi-purchase consumable, can be depleted and repurchased.
- Managed (non-consumable). One-time permanently owned product or upgrade.
- Subscription. Product with recurring payments at specific intervals.
- Reward (Android). Provide reward for the user for watching an advertisement via AdMob. Mostly used in games.
Android Setup
The Play Store Billing API will not work until you have at least an Alpha release track. If you do not have an existing app, check off the items below before proceeding further.
✔️ Register your app and package ID (i.e com.fireship.myapp) in the Google Play Console.
✔️ Follow the steps to create a signed release APK. Or watch the Android Flutter Deployment video 🎥.
✔️ Upload the signed APK to Google Play and release it under the Alpha channel. Add testers to the track.
Add a Managed Product
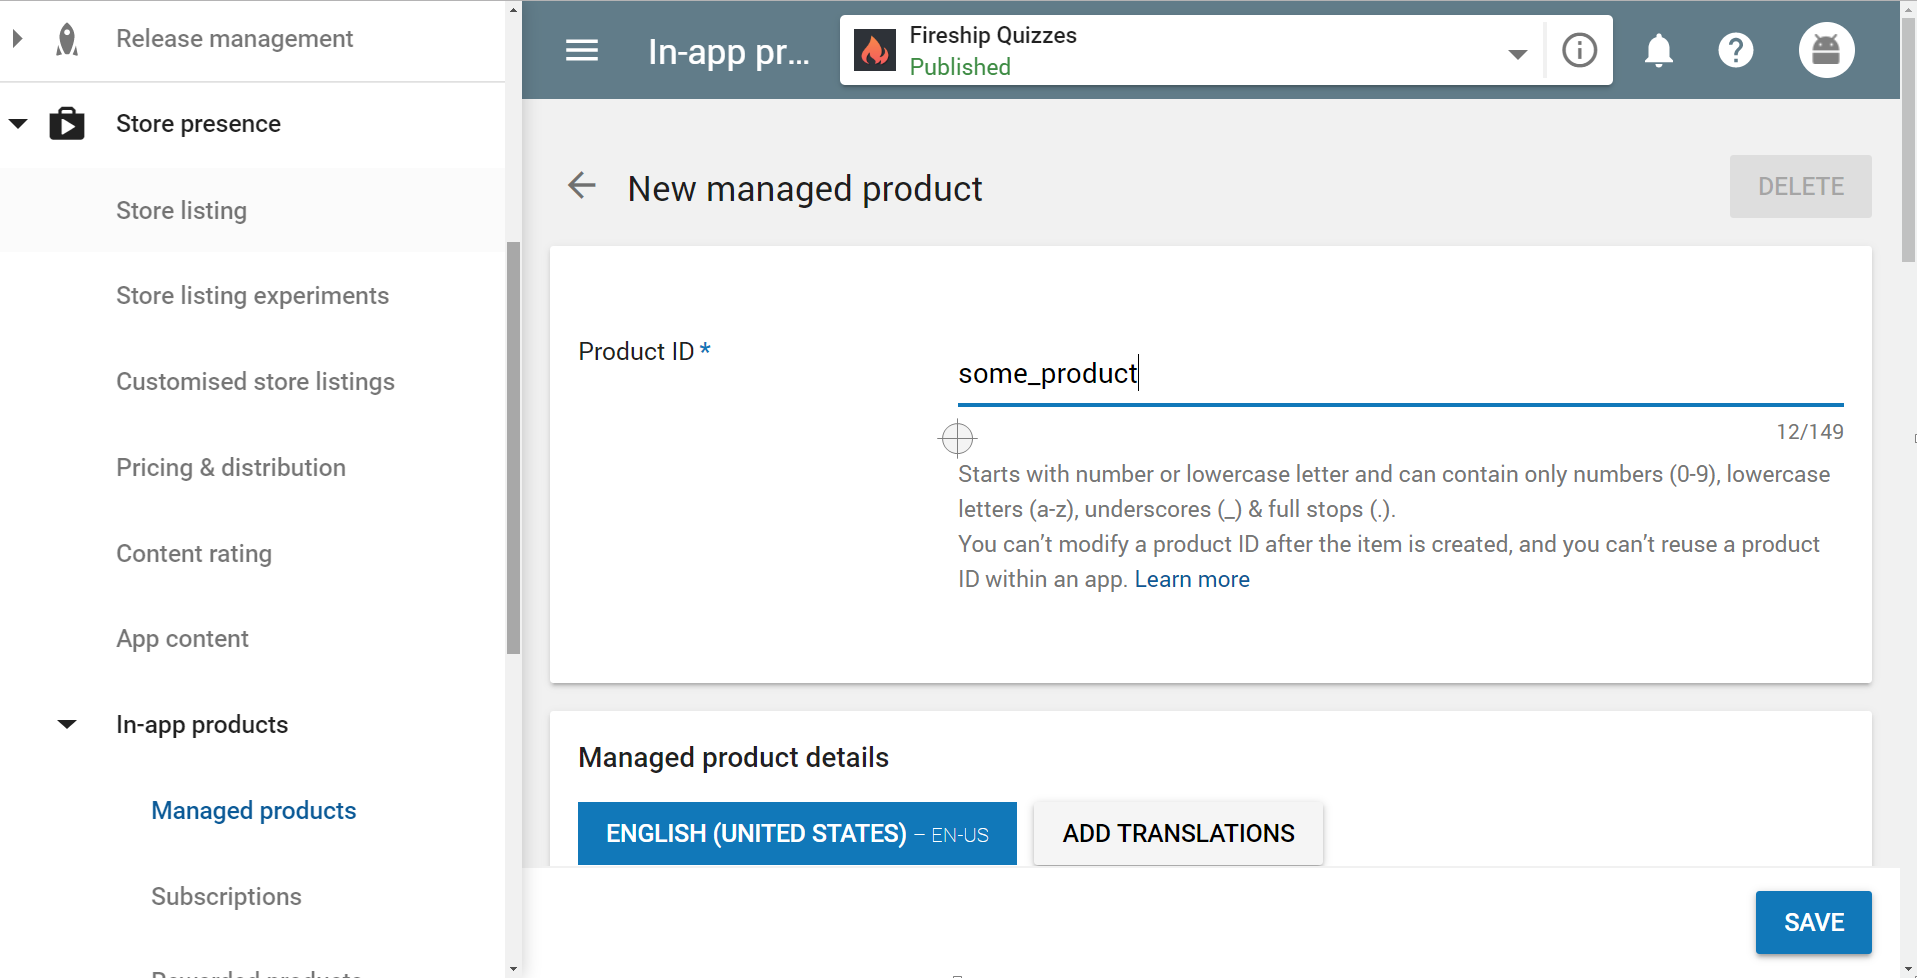
Setup a merchant account and create a managed product
Apple App Store Setup
The setup for iOS is similar and requires an existing Apple developer account.
✔️ Release your app and package ID (i.e com.fireship.myapp) to App Store Connect.
✔️ Follow the steps to create an iOS release. Or watch the iOS Flutter Deployment video 🎥.
Enable IAP Capability in XCode
You can enable In App Purchases in Xcode by selecting the build target and flipping the switch under the capabilities tab.
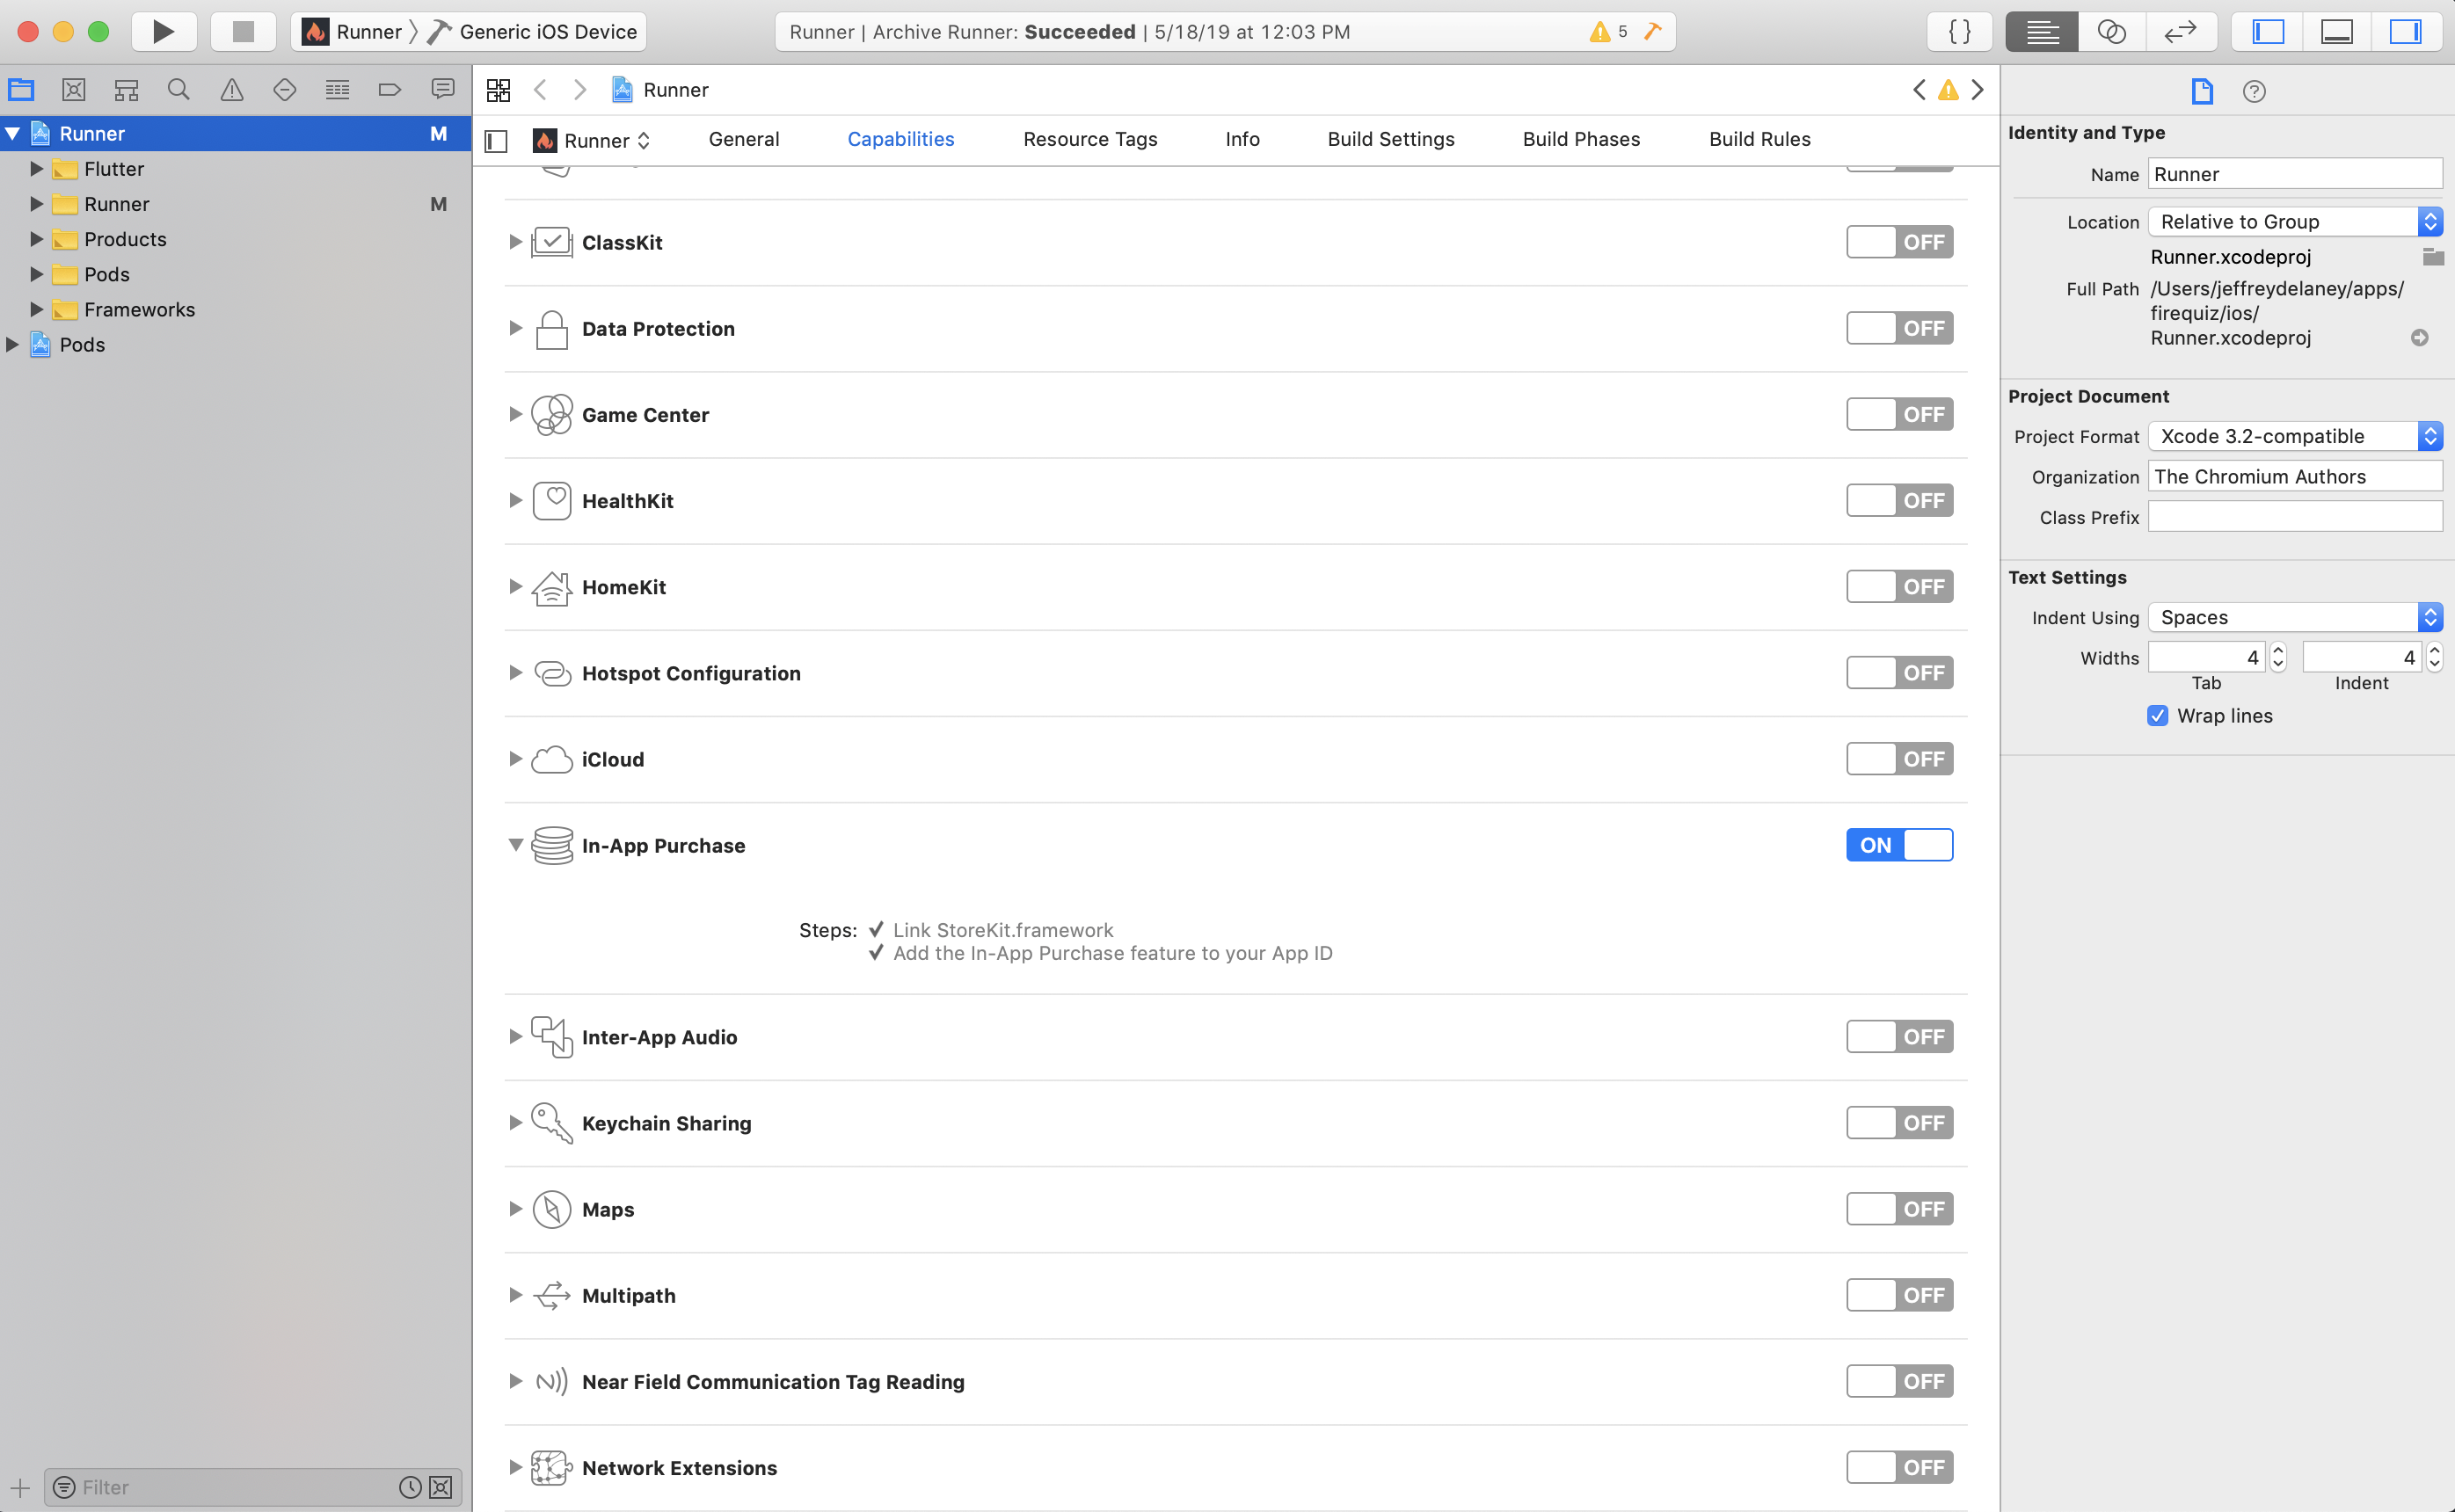
Enable In App Purchases in Xcode
App Store Connect Products
Create a consumable product in Xcode. Make sure to keep the “product ID” consistent between the App Store and Play Store.

Create a product on App Store Connect
Flutter In App Purchases Demo
The code below demonstrates how to implement a single consumable product. First, add the plugin to your dependencies.
dependencies:
  flutter:
    sdk: flutter

  in_app_purchase: 0.2.0+1
In App Purchases Widget Overview
Let’s start by creating a StatefulWidget with an abstract representation of the data we’ll need to manage for In App Purchases. This widget handles the entire IAP flow, including the retrieval of products/purchases and the facilitation of new purchases.
The code notes below marked TODO are recommendations that you should implement based on your backend setup. For example, you may want to save the the state of a consumable purchase in a database.
import 'dart:async';
import 'dart:io';
import 'package:flutter/material.dart';
import 'package:in_app_purchase/in_app_purchase.dart';

final String testID = 'gems_test';

class MarketScreen extends StatefulWidget {
  createState() => MarketScreenState();
}

class MarketScreenState extends State<MarketScreen> {

  /// Is the API available on the device
  bool available = true;

  /// The In App Purchase plugin
  InAppPurchaseConnection _iap = InAppPurchaseConnection.instance;

  /// Products for sale
  List<ProductDetails> _products = [];

  /// Past purchases
  List<PurchaseDetails> _purchases = [];

  /// Updates to purchases
  StreamSubscription _subscription;

  /// Consumable credits the user can buy
  int credits = 0;

  @override
  void initState() {
    _initialize();
    super.initState();
  }

  @override
    void dispose() {
      _subscription.cancel();
      super.dispose();
   }

  /// Initialize data
  void _initialize() async {

  }


  @override
  Widget build(BuildContext context) {

    return Scaffold(
      appBar: AppBar(
        title: Text(available ? 'Open for Business' : 'Not Available'),
      ),
      body: Center(
        child: Column(
          children: [
            for (var prod in _products)

              // UI if already purchased
              if (_hasPurchased(prod.id) != null)
                ...[

                ]

              // UI if NOT purchased
              else ...[

            ]
          ],
        ),
      ),
    );
  }


  // Private methods go here

}
Step 1 - Get Products and Past Purchases
When the app is first initialized you must complete the following tasks:
- Fetch products.
- Fetch past purchases.
- Determine if the user has already purchased certain items and deliver them in the app.
In the case of consumable products, you will also likely need to query your own database for the current state of the product, such as the “user’s remaining gems”.
  /// Initialize data
  void _initialize() async {

    // Check availability of In App Purchases
    _available = await _iap.isAvailable();

    if (_available) {

      await _getProducts();
      await _getPastPurchases();

      // Verify and deliver a purchase with your own business logic
      _verifyPurchase();

    }
  }


  /// Get all products available for sale
  Future<void> _getProducts() async {
    Set<String> ids = Set.from([testID, 'test_a']);
    ProductDetailsResponse response = await _iap.queryProductDetails(ids);

    setState(() {
      _products = response.productDetails;
    });
  }

  /// Gets past purchases
  Future<void> _getPastPurchases() async {
    QueryPurchaseDetailsResponse response =
        await _iap.queryPastPurchases();

    for (PurchaseDetails purchase in response.pastPurchases) {
      final pending = Platform.isIOS
        ? purchaseDetails.pendingCompletePurchase
        : !purchaseDetails.billingClientPurchase.isAcknowledged;

        if (pending) {
          InAppPurchaseConnection.instance.completePurchase(purchase);
        }
    }

    setState(() {
      _purchases = response.pastPurchases;
    });
  }

  /// Returns purchase of specific product ID
  PurchaseDetails _hasPurchased(String productID) {
    return _purchases.firstWhere( (purchase) => purchase.productID == productID, orElse: () => null);
  }

  /// Your own business logic to setup a consumable
  void _verifyPurchase() {
    PurchaseDetails purchase = _hasPurchased(testID);

    // TODO serverside verification & record consumable in the database

    if (purchase != null && purchase.status == PurchaseStatus.purchased) {
      _credits = 10;
    }
  }
Step 2 - Handle New Purchases
- Allow the user to make a new purchase.
- Listen to a Stream that emits new purchases.
By default the plugin will automatically mark the product as consumed, but you can override this behavior with the autoConsume argument. If you set it to false, you must manually mark the product as consumed to enable another purchase (Android only).
The stream only emits the latest purchase as a List, so make sure to merge the emitted value into _purchases and not overwrite the existing list.
  void _initialize() async {

      // ... omitted


      // Listen to new purchases
      _subscription = _iap.purchaseUpdatedStream.listen((data) => setState(() {
        print('NEW PURCHASE');
        _purchases.addAll(data);
        _verifyPurchase();
      }));
  }

  /// Purchase a product
  void _buyProduct(ProductDetails prod) {
    final PurchaseParam purchaseParam = PurchaseParam(productDetails: prod);
    // _iap.buyNonConsumable(purchaseParam: purchaseParam);
    _iap.buyConsumable(purchaseParam: purchaseParam, autoConsume: false);
  }
Step 3 - Consume the Product
If you are selling one-time upgrade purchase you’re done at this point. However, we turned autoConsume off in the previous step, so the product can only be repurchased the purchase has been marked as consumed.
Keep in mind, you should also save the state of the consumable product on your backend database. It cannot be retrieved after the widget is destroyed.
  /// Spend credits and consume purchase when they run pit
  void _spendCredits(PurchaseDetails purchase) async {

    /// Decrement credits
    setState(() { _credits--; });

    /// TODO update the state of the consumable to a backend database

    // Mark consumed when credits run out
    if (_credits == 0) {
      var res = await _iap.consumePurchase(purchase);
      await _getPastPurchases();
    }

  }
Step 4 - The UI
The build method implements a bare minimum UI that loops over each product and provides buttons to buy and consume them.
  @override
  Widget build(BuildContext context) {

    return Scaffold(
      appBar: AppBar(
        title: Text(available ? 'Open for Business' : 'Not Available'),

      ),
      body: Center(
        child: Column(
          mainAxisAlignment: MainAxisAlignment.center,
          children: [
            for (var prod in _products)

              // UI if already purchased
              if (_hasPurchased(prod.id) != null)
                ...[
                  Text('💎 $credits', style: TextStyle(fontSize: 60)),
                  FlatButton(
                    child: Text('Consume'),
                    color: Colors.green,
                    onPressed: () => _spendCredits(_hasPurchased(prod.id)),
                  )
                ]

              // UI if NOT purchased
              else ...[
                Text(prod.title, style: Theme.of(context).textTheme.headline),
                Text(prod.description),
                Text(prod.price,
                    style: TextStyle(color: Colors.greenAccent, fontSize: 60)),
                FlatButton(
                  child: Text('Buy It'),
                  color: Colors.green,
                  onPressed: () => _buyProduct(prod),
                ),
            ]
          ],
        ),
      ),
    );
  }