
Flutter Animated Radial Menu
Building a flashy animated radial menu in Flutter can be done with ease thanks to the Transform widget and staggered animations. The following lesson will teach you how to compose flutter animations into a cool rotating circular widget, which can easily maintain 60FPS on modern smartphones.
Step 1 - Initial Setup
We will define two custom widgets for this demo.
The parent RadialMenu is a StatefulWidget responsible for defining an AnimationController that sets a duration for the animation. It also has the ability to start/stop the animation.
The child RadialAnimation does most of the heavy lifting by using Flutter’s AnimatedBuilder widget to define the animated UI elements and apply multiple Tween animations within a single build context. It takes the animation controller from the parent component as an input.
App Skeleton
import 'package:flutter/material.dart';
import 'dart:math';
import 'package:vector_math/vector_math.dart' show radians;
import 'package:font_awesome_flutter/font_awesome_flutter.dart';

void main() => runApp(MyApp());


// The parent Material App
class MyApp extends StatelessWidget {
  @override
  Widget build(BuildContext context) {

    return MaterialApp(
        home: Scaffold(
            body: SizedBox.expand(child: RadialMenu())
        )
    );
  }
}


// The stateful widget + animation controller
class RadialMenu extends StatefulWidget {
  createState() => _RadialMenuState();
}

class _RadialMenuState extends State<RadialMenu> with SingleTickerProviderStateMixin {

  AnimationController controller;

  @override
  Widget build(BuildContext context) {
    return RadialAnimation(controller: controller);
  }

}


// The Animation
class RadialAnimation extends StatelessWidget {
    final AnimationController controller;
    RadialAnimation({ Key key, this.controller }) : super(key: key);


    build(context) {
      return null;
    }
}
Profiling Animation Performance
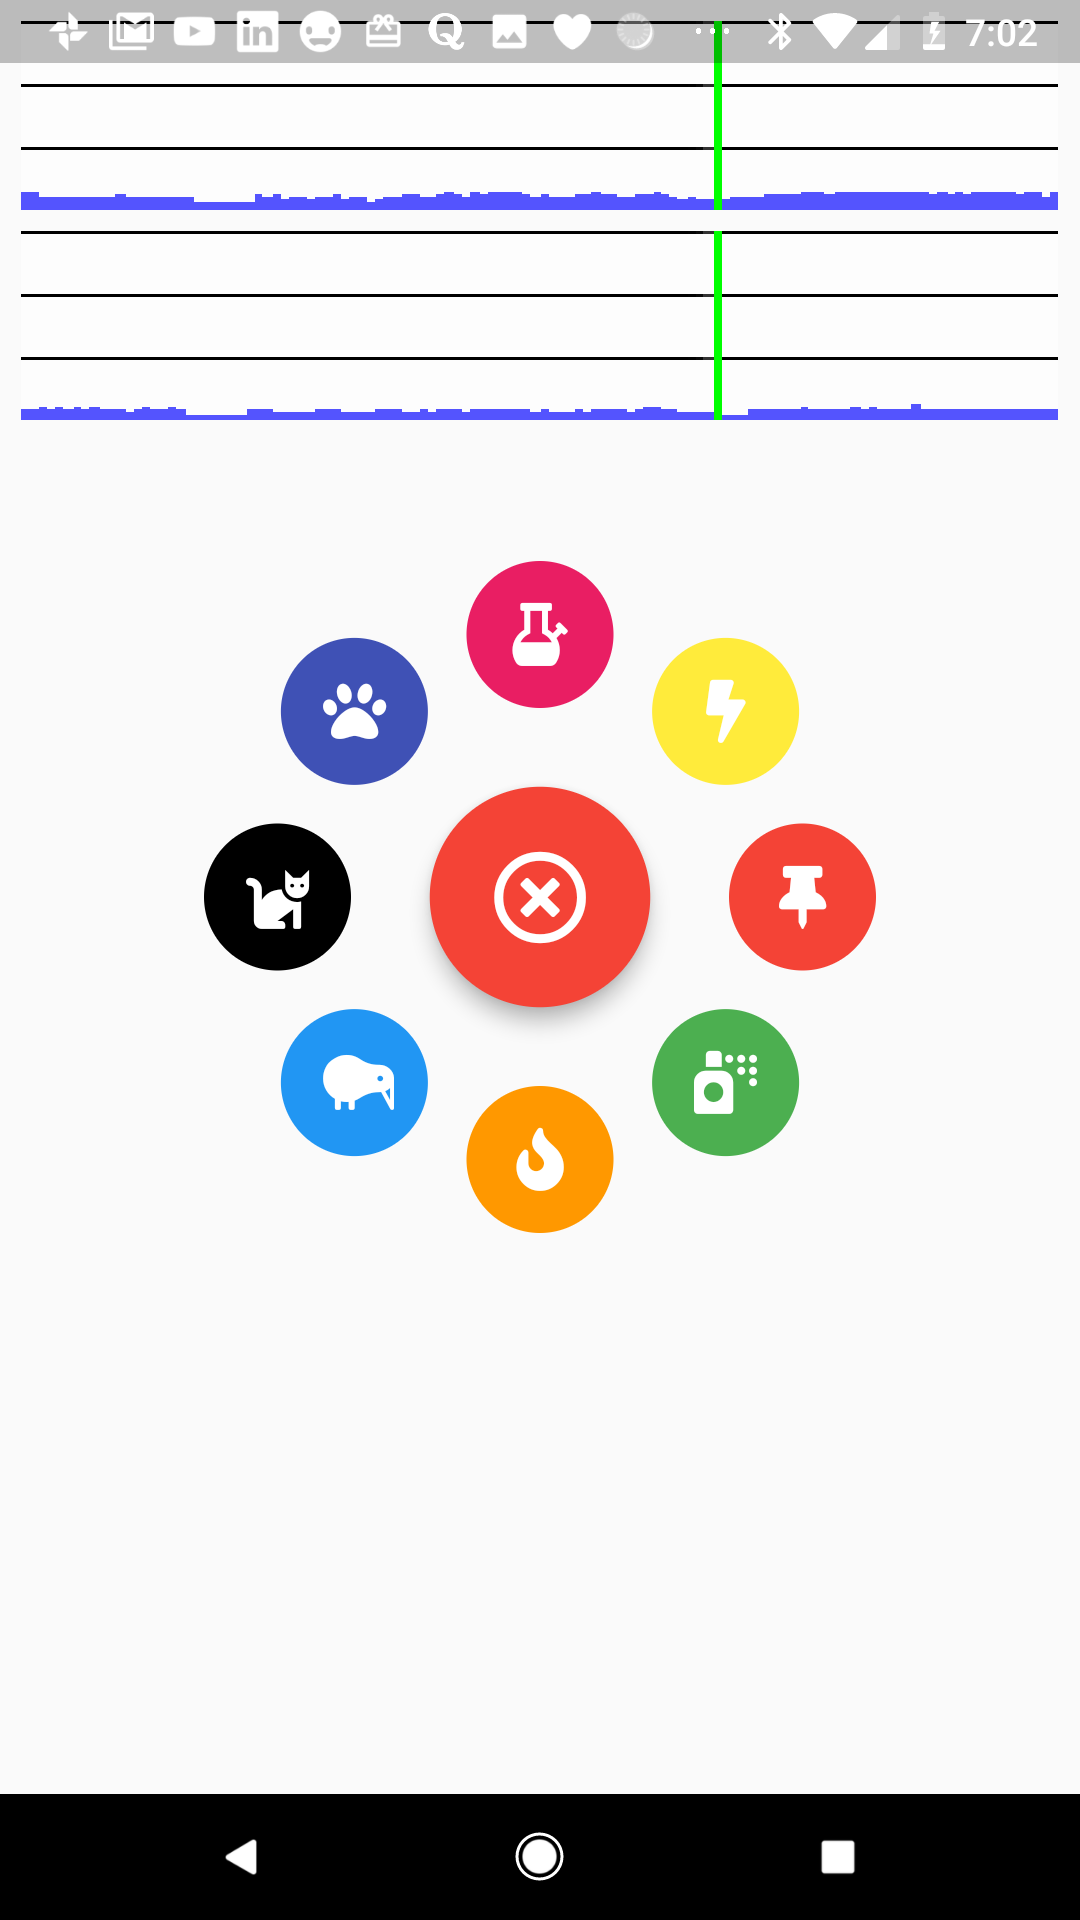
I highly recommend running your app on a real device to make use of Flutter’s Performance Profiling tools. As long as you maintain 60 frames-per-second (FPS), your app should be perceived as “butter smooth” 🥞. As you can see from the profile below the animation has plenty of room to spare on a Pixel 2. Smaller blue bars means faster rendering for each frame (they will become red when perf starts to degrade).
Step 2 - Animate the Open and Close Buttons
The first animation will toggle the visibility of the open/close button in the middle of the menu.
Define the Animation Controller
The controller lives in the StatefulWidget and defines the total durtation of the animation.
class _RadialMenuState extends State<RadialMenu> with SingleTickerProviderStateMixin {

  AnimationController controller;

  @override
  void initState() {
    super.initState();
    controller = AnimationController(duration: Duration(milliseconds: 900), vsync: this);
  }
}
Open/Close Button Scale Animation
All of the buttons in the radial menu will be stacked on top of each other, then animated around the center when the menu is opened.
- The Tween defines the values that will change over the course of the animation. For example, we start at a size of 150%, then scale down to 0%.
- The CurvedAnimation defines the Bezier curve - or timing function - of the animation over its lifecycle. Flutter has a bunch of built-in curves that that will make your animations more exciting, so experiment with these.
- Transform.scale() wrapps the floating action buttons and will dynamically apply scale changes when the animation is running.
class RadialAnimation extends StatelessWidget {
    RadialAnimation({ Key key, this.controller }) :

      scale = Tween<double>(
        begin: 1.5,
        end: 0.0,
      ).animate(
        CurvedAnimation(
          parent: controller,
          curve: Curves.fastOutSlowIn
        ),
      ),

    super(key: key);

    final AnimationController controller;
    final Animation<double> scale;


    build(context) {
      return AnimatedBuilder(
        animation: controller,
        builder: (context, builder) {
          return Stack(
            alignment: Alignment.center,
            children: [
              Transform.scale(
                scale: scale.value - 1.5, // subtract the beginning value to run the opposite animation
                child: FloatingActionButton(
                  child: Icon(FontAwesomeIcons.timesCircle),
                  onPressed: _close,
                  backgroundColor: Colors.red
                ),
              ),

              Transform.scale(
                scale: scale.value,
                child: FloatingActionButton(
                  child:
                  Icon(FontAwesomeIcons.solidDotCircle),
                  onPressed: _open
                ),
              )
          ]);
      });
    }

    _open() {
      controller.forward();
    }

    _close() {
      controller.reverse();
    }
}
Step 3 - Animate the Surrounding Buttons
The next section is the most challenging because we need to determine the correct x,y position of each button from the center of a circle - this require some Trigonometry 📐.
Translate to Points around the Circle
In the code below we use some basic trig to determine the x,y position of a button based on a fixed angle (in radians) and a distance (the current value of the translation animation). Extracting this logic to a _buildButton helper function allows us to quickly add new buttons to the menu with their own custom colors and icons.
Also, this animation is rendered with a Matrix4 Transformation Matrix. You can do some amazing things with 3D perspective animations by chaining together different transformations, for example Matrix4.identity()..translate()..scale()..skew();
class RadialAnimation extends StatelessWidget {
    RadialAnimation({ Key key, this.controller }) :

      // ...omitted

      translation = Tween<double>(
        begin: 0.0,
        end: 100.0,
      ).animate(
        CurvedAnimation(
          parent: controller,
          curve: Curves.linear
        ),
      ),

    super(key: key);

    final AnimationController controller;
    final Animation<double> scale;
    final Animation<double> translation;


    build(context) {
      return AnimatedBuilder(
        animation: controller,
        builder: (context, builder) {
          return Stack(
            alignment: Alignment.center,
            children: [
              _buildButton(0, color: Colors.red, icon: FontAwesomeIcons.thumbtack),
              _buildButton(45, color: Colors.green, icon:FontAwesomeIcons.sprayCan),
              _buildButton(90, color: Colors.orange, icon: FontAwesomeIcons.fire),
              _buildButton(135, color: Colors.blue, icon:FontAwesomeIcons.kiwiBird),
              _buildButton(180, color: Colors.black, icon:FontAwesomeIcons.cat),
              _buildButton(225, color: Colors.indigo, icon:FontAwesomeIcons.paw),
              _buildButton(270, color: Colors.pink, icon: FontAwesomeIcons.bong),
              _buildButton(315, color: Colors.yellow, icon:FontAwesomeIcons.bolt),
              // ...omitted
          ]);
      });
    }

    _buildButton(double angle, { Color color, IconData icon }) {
      final double rad = radians(angle);
      return Transform(
        transform: Matrix4.identity()..translate(
          (translation.value) * cos(rad),
          (translation.value) * sin(rad)
        ),

        child: FloatingActionButton(
          child: Icon(icon), backgroundColor: color, onPressed: _close, elevation: 0)
      );
    }
Step 4 - Rotate the Entire Set of Buttons
Lastly, let’s rotate the entire stack of buttons. The main difference to note with this animation is that it uses an Interval to stagger the rotation with specific start/end times relative to the total animation timeline.
class RadialAnimation extends StatelessWidget {
    RadialAnimation({ Key key, this.controller }) :

    // ...

    rotation = Tween<double>(
      begin: 0.0,
      end: 360.0,
    ).animate(
      CurvedAnimation(
        parent: controller,
        curve: Interval(
          0.3, 0.9,
          curve: Curves.decelerate,
        ),
      ),
    ),

    super(key: key);

    final AnimationController controller;
    final Animation<double> scale;
    final Animation<double> translation;
    final Animation<double> rotation;

    build(context) {
      return AnimatedBuilder(
        animation: controller,
        builder: (context, builder) {
          return Transform.rotate( // Add rotation
            angle: radians(rotation.value),
            child: Stack(
              alignment: Alignment.center,
              children: [...]
            )
          );
      });
    }


}
The End
Animations in Flutter render beautifully, but can become verbose if you’re not careful. Be liberal about extracting logic into helper functions and use AnimatedBuilders to avoid excessive boilerplate.