
Ionic Routing and Navigation Guide
The single most important change from Ionic v3 to v4 is how routing and navigation is handled. In the past, Ionic used its own push-pop NavController, but has since decieded to use the Angular Router directly. This is a very smart move in my opinion because Angular’s router is just so powerful - but it does have a bit of a learning curve. In the following lesson, you will learn the fundamental concepts required to be successful with routing and navigation in Ionic 4.
Ionic v4 Routing Basics with Angular
If migrating from Ionic 3, be aware that some familiar Ionic navigation elements have been deprecated in version 4. While they work, it is NOT recommended to use `NavController` or `ion-nav`.
The root configuration for the router lives in the src/app/app-routing.module.ts file. You may need to define routes manually, but it will be done automatically with the CLI when you generate a page.
const routes: Routes = [
  // your routes go here
  { path: 'hello', component: HelloPage }
];
The HelloPage component will be rendered where the outlet is defined in the HTML in the app.component.html
<ion-app>
  <ion-router-outlet></ion-router-outlet>
</ion-app>
When you navigate to the /hello path in the browser, it will render specified component in the HTML outlet.
0. Pro Tip - Install the Augury Chrome Plugin
Install the Augury plugin for Chrome to inspect and debug routing issues. It allows you to visualize the router tree, which is especially as your Ionic app starts adding multiple lazy-loaded pages and named outlets.
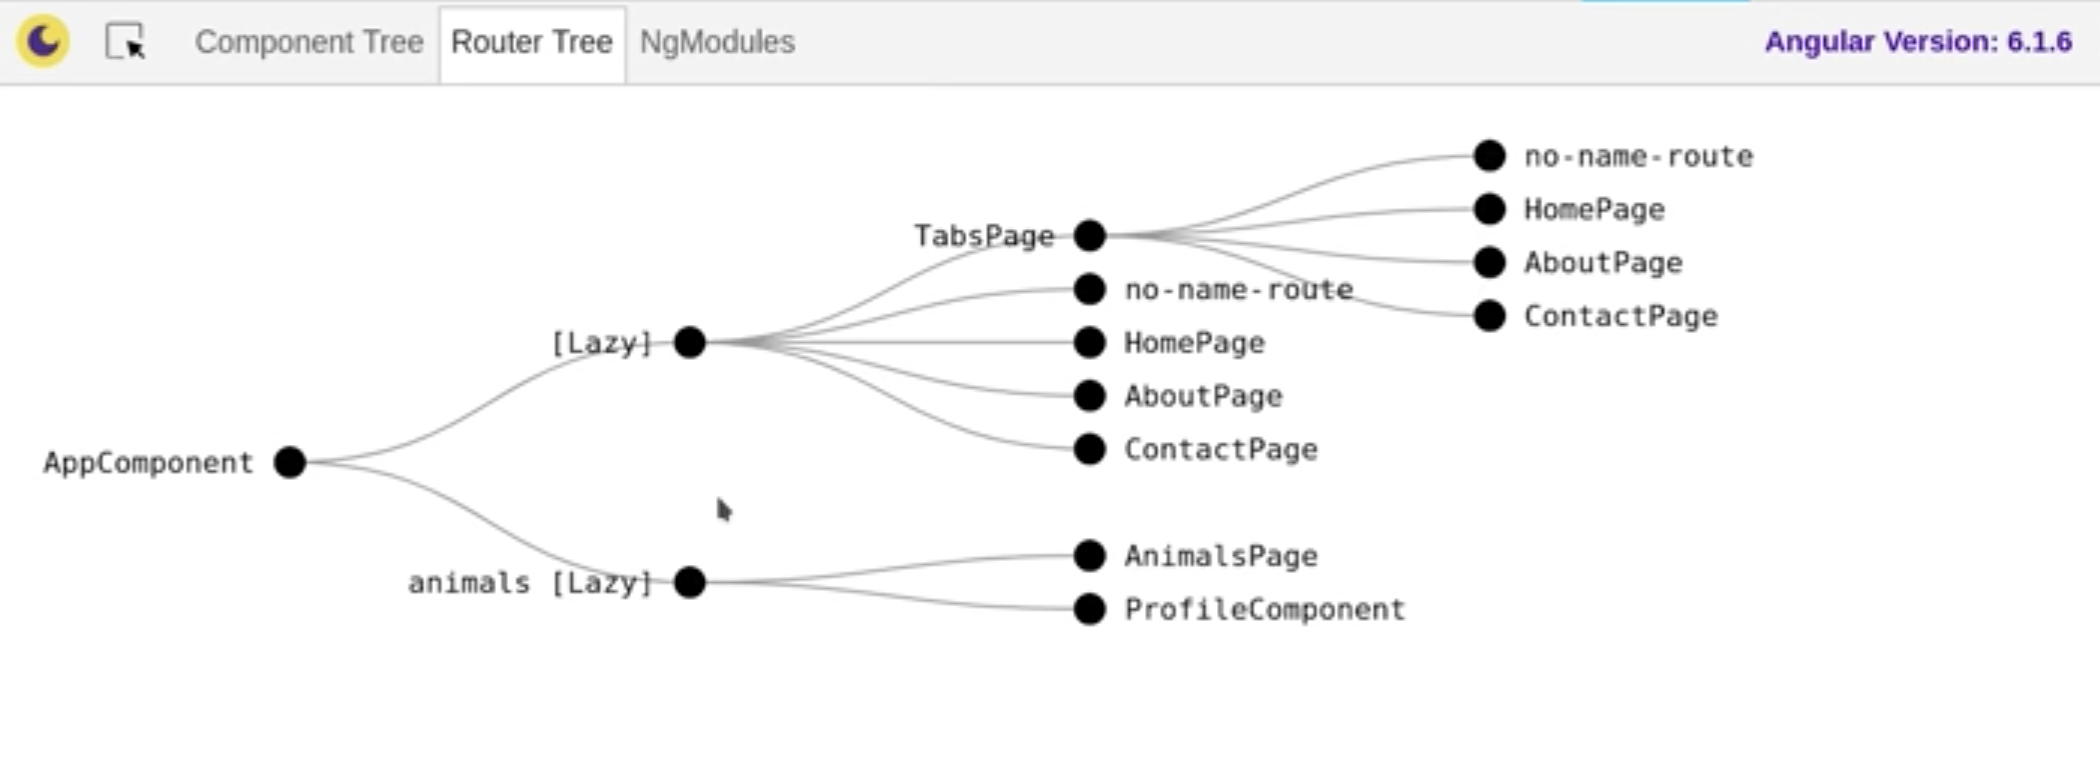
Ionic routing tree
1. Define the Route in the app-routing.module.ts
A route simply defines a URL path and a component to display it’s content. There are three main types of routes that you will use frequently, (1) eager-loaded (2) lazy-loaded (Ionic Pages), and (3) redirects.
- Eager. Routes that point to a single component.
- Lazy. Routes that point to a module.
- Redirect. Routes that redirect to another route.
const routes: Routes = [
  // Regular Route
  { path: 'eager', component: MyComponent },

  // Lazy Loaded Route (Page)
  { path: 'lazy', loadChildren: './lazy/lazy.module#LazyPageModule' },

    // Redirect
  { path: 'here', redirectTo: 'there', pathMatch: 'full' }
];
Now lets look at the various ways we can navigate to our routes.
2a. Declare a Link in the HTML
A button or link is the most basic way to navigate to one of your defined routes.
<ion-button href="/hello">Hello</ion-button>
You can also use the Angular Router syntax for non-ionic components
<a routerLink="/hello">Hello</a>
2b. Navigate Programmatically with the Angular Router
You might also navigate dynamically from a component or service. A common use-case is when you need to wait for something async to finish, then send the user to a new page. Angular provides a Router service that we can inject into components by declaring it in the constructor.
import { Component } from '@angular/core';
import { Router } from '@angular/router';

@Component({ ... })
export class HomePage {
  constructor(private router: Router) {}

  go() {
    this.router.navigateByUrl('/animals');
  }
}
3. Navigate to Dynamic URLS
In many cases, you need to navigate to a path that looks like /items/:id and you don’t know the ID value in advance. Let’s setup a route that can handle dynamic params. You can make a URL segment dynamic by prefixing it with :, which is a useful technique for sharing data between components or pages.
const routes: Routes = [
  // Regular Route
  { path: 'items/:id', component: MyComponent },
];
Any valid string pattern can be used for the second URL segment. Both will render the same component, but pass a different ID through the params.
<ion-button href="/items/abc">ABC</ion-button>
<ion-button href="/items/xyz">XYZ</ion-button>
4. Extract Data from Routes with ActivatedRoute
When working with dynamic data, you need to extract the params from the URL. For example, you might want to read from the database when the user navigates to /items/:id, using the ID from the route to make a query. Angular has an ActivatedRoute service that allows us to grab information from the current route as a plain object or Observable.
import { Component, OnInit } from '@angular/core';
import { ActivatedRoute } from '@angular/router';

@Component({ ... })
export class ProfileComponent implements OnInit {

  id: string;

  constructor(private route: ActivatedRoute) {}

  ngOnInit() {
    this.id = this.route.snapshot.paramMap.get('id');
  }
}
Or if we need to react to changes, we can subscribe to an Observable.
  ngOnInit() {
    this.route.params.subscribe(...);
  }
Lazy Loading
Ionic handles the heavy lifting for Lazy Loading when you generate a new page with the CLI.
ionic generate page about
But it’s still important to understand the code that is generated with this command. Instead of routing to a component, the route is configured to load a child module (that many contain many components). This is especially beneficial for Progressive Web Apps where page load times are critical. This magic is made possible with Webpack Code Splitting.
(1) In the app-routing.module.ts we have a lazy loaded route:
const routes: Routes = [
  { path: 'about', loadChildren: './about/about.module#AboutPageModule' },
];
(2) In the about/about.module.ts we have a routing config for this child with a regular eager route.
const routes: Routes = [
  { path: '', component: AboutPage },
];
Tab Routing
An advanced technique is to use named outlets and secondary routes for rendering nested content inside the view - this is how the Ionic Tabs starter template works. The reason behind this routing setup is to achieve a push/pop style of navigation commonly used in native apps. Remember, the NavController from Ionic 3 is deprecated, so named outlets in Angular provide a comparable replacement.
When you have a route object that looks like this:
{
  path: 'contact',
  outlet: 'modal',
  component: ContactModal
}
Your actual URL will have parenthesis with a format of (outlet:path).
http://.../(modal:contact)
In the HTML, this route will be looking for an outlet with the matching name.
<ion-router-outlet name="modal"></ion-router-outlet>
Guards
See guards in action in Episode 129 where we build an [app intro tutorial for Ionic 4 and Angular Guards](https://angularfirebase.com/lessons/ionic4-intro-slides-tutorial-to-educate-app-users/).
Guards are an extremely powerful and under-utilized tool in the Angular router. At first, they might seem overwhelming, but they are really just the implementation of a single method, typically canActivate, which must return a boolean or something that resolves to a boolean, like a Promise or Observable.
ionic generate guard auth
Guards will allow you to use consistent logic for protecting routes or handling route transitions. Let’s imagine we want to make sure a user is logged in before activating a route. The code below is how a guard might handle this logic.
@Injectable({
  providedIn: 'root'
})
export class AuthGuard implements CanActivate {
  constructor(private router: Router) {}

  canActivate(
    next: ActivatedRouteSnapshot,
    state: RouterStateSnapshot
  ): boolean {

    const loggedIn = false; // replace with actual user auth checking logic

    if (!loggedIn) {
      this.router.navigate(['/']);
    }

    return loggedIn;
  }
}
Now you can apply this rule to as many routes as you need in the router config.
const routes: Routes = [
  { path: 'special', component: SpecialPage, canActivate: [AuthGuard] },
];
The End
That wraps up the core concepts needed to excel with the Angular Router in Ionic 4. The router is one of the biggest strengths in Angular and allows you to write flexible, yet maintainable navigation code.