
Reactive Crud App With Angular and Firebase Tutorial
⚠️ This lesson has been archived! Check out the Full Angular Course for the latest best practices about building a CRUD app.
We’re going to be building a basic list of items that you do CRUD to - create, read, update, delete. The feature itself is nothing special, it’s really just a skeleton that demonstrates how to do the most common operations with Angular and Firebase. The realtime database from Firebase uses NoSQL, so think of CRUD in the following terms.
firestarter demo app crud items with nosql
SQL vs. NoSQL
The term CRUD doesn’t really work for Firebase NoSQL, but here’s a general translation for our app.
- create => push
- read => list or object
- update => update or set
- delete => remove
Thinking Reactively
Angular apps work with asynchronous data streams using RxJS reactive extensions for JavaScript. A data stream can be anything, but in this context we are talking about objects from the firebase realtime NoSQL database.
Checkout the RxJS manual for comprehensive explanation of reactive extensions. Here are a few important concepts for this lesson.
Observer: Think of an observer as the Angular component that cares about listening to a data stream. Example: Your ItemsListComponent wants to listen to a stream of items so they can be displayed to the user.
Observable: Think of an observable as a promise to handle multiple future values.
Subscription: Observables can be subscribed to, which will provide a snapshot of the stream. In this tutorial it would be a JavaScript object of an item from the database.
The observable pattern allows the frontend UI (Angular) to asynchronously stay up-to-date with the database (Firebase). When we get items from Firebase, we are getting an observable, not a regular JavaScript object. So how do you extract data from an Observable? That’s what this lesson is all about.
Step 1: Generate the Files
 ng g service items/shared/item
 ng g class items/shared/item
 ng g component items/items-list
 ng g component items/item-detail
 ng g component items/item-form
Step 2: Define the Item Class
It’s generally good practice to define data objects in their own TypeScript class.
item.ts
export class Item {
  $key: string;
  title: string;
  body: string;
  timeStamp: number;
  active: boolean = true;
}
Step 3: Building the Service
This is where all the CRUD magic happens. The service will perform 6 basic operations. AngularFire gives us a simple API to perform these operations with minimal code.
- Get a list of items
- Get a single item
- Create a new item
- Update an existing item
- Delete a single item
- Delete an entire list of items
Declaring Variables and Helper Functions
Public variables for item and items are declared for the Firebase observables. We also declare a variable for the path in the NoSQL database. When we perform one of the get operations, the observable variables will be defined In most cases, you will call a get method from a component during the NgInit() lifecycle hook. I am also declaring a helper function to handle errors, which simply logs the error for debugging.
import { Injectable } from '@angular/core';
import { FirebaseListObservable, FirebaseObjectObservable, AngularFireDatabase } from 'angularfire2/database';
import { Item } from './item';

@Injectable()
export class ItemService {

  private basePath: string = '/items';

  items: FirebaseListObservable<Item[]> = null; //  list of objects
  item: FirebaseObjectObservable<Item> = null; //   single object

  constructor(private db: AngularFireDatabase) { }
}
Getting the Observables from Firebase
After calling one of these methods, the data will be synced up with Firebase. Changes made via the UI will be instantly reflected in the database console, and vice versa.
  getItemsList(query={}): FirebaseListObservable<Item[]> {
    this.items = this.db.list(this.basePath, {
      query: query
    });
    return this.items
  }

  // Return a single observable item
  getItem(key: string): FirebaseObjectObservable<Item> {
    const itemPath =  `${this.basePath}/${key}`;
    this.item = this.db.object(itemPath)
    return this.item
  }
Creating Updating, and Deleting Data
The remaining functions do not have return values. They will update the data from the list observable, held in the items variable from the previous section.
 createItem(item: Item): void  {
    this.items.push(item)
      .catch(error => this.handleError(error))
  }


  // Update an existing item
  updateItem(key: string, value: any): void {
    this.items.update(key, value)
      .catch(error => this.handleError(error))
  }

  // Deletes a single item
  deleteItem(key: string): void {
      this.items.remove(key)
        .catch(error => this.handleError(error))
  }

  // Deletes the entire list of items
  deleteAll(): void {
      this.items.remove()
        .catch(error => this.handleError(error))
  }

  // Default error handling for all actions
  private handleError(error) {
    console.log(error)
  }
Extracting Data from the Observable
If you require a snapshot of the data at a given time, you get the regular JavaScript object by subscribing to the observable. This is usually not necessary because we can unwrap observables using the async pipe in the template as we will see in the next section.
this.item = this.db.object('/item', { preserveSnapshot: true });
  this.item.subscribe(snapshot => {
  console.log(snapshot.key)
  console.log(snapshot.val())
});
Step 4: Item List Component - The Parent
The <item-list> is the parent component that will loop over the FirebaseListObservable and handle actions related the entire list, mainly deleting all items from the list.
items-list.component.html
Let’s start in the template. We loop over the items using *ngFor, but the important thing to note is the async pipe. It will subscribe and unwrap any observable as changes happen in the data stream.
Also, notice we are passing each unwrapped item object to the child component. More on this in the next section.
<div *ngFor="let item of items | async" >
  <item-detail [item]='item'></item-detail>
</div>
<button (click)='deleteItems()'>Delete Entire List</button>
items-list.component.ts
Now we need to define the items variable when the component is initialized using NgOnInit. We also create a function to delete the entire list that can be called on the button’s click event in the template.
export class ItemsListComponent implements OnInit {

  public items: FirebaseListObservable<Item[]>;

  constructor(private itemSvc: ItemService) { }

  ngOnInit() {
    this.items = this.itemSvc.getItemsList({limitToLast: 5})
  }

  deleteItems() {
    this.itemSvc.deleteAll()
  }
}
Step 5: Item Detail Component - Passing Data to a Child Component
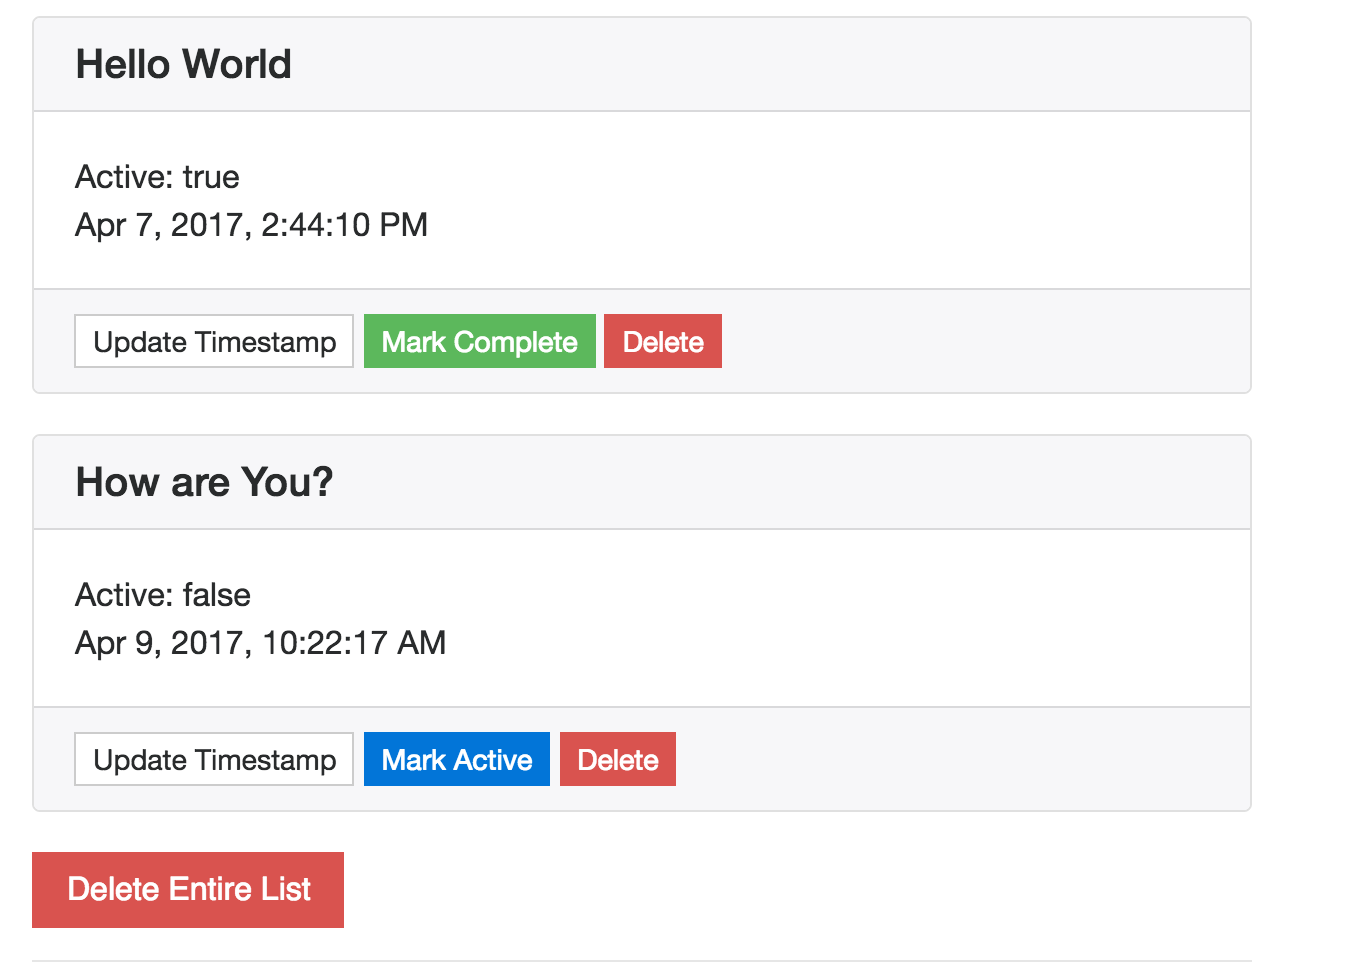
items-detail.component.html
The <item-detail> component is rendered for each task returned by the list observable. The @Input decorator is used to pass data from a parent to a child via the template - in this case it an Item object after being unwrapped by the async pipe. From the template we will display the items attributes, then create a few buttons to trigger actions from the service.
<h5>{{ item.title || 'missing title' }}</h5>
Active: {{ item.active }}
{{ item.timeStamp | date: 'medium' }}

<span (click)='updateTimeStamp()'>Update Timestamp</span>
<span *ngIf='item.active' (click)='updateActive(false)'>Mark Complete</span>
<span *ngIf='!item.active' (click)='updateActive(true)'>Mark Active</span>
<span (click)='deleteItem()'>Delete</span>
items-detail.component.
All functions in this component are scoped to modifying an existing item. Here’s a few examples of how use the service to update items in the database.
If you need a consistent global timestamp, it is best to use `firebase.database.ServerValue.TIMESTAMP` rather than a JavaScript `Date` object. The JS Date is tied to the user's local system, which will result in inconsistencies between clients.
export class ItemDetailComponent {

  @Input() item: Item;

  constructor(private itemSvc: ItemService) { }

  updateTimeStamp() {
    let date = new Date().getTime()
    this.itemSvc.updateItem(this.item.$key, { timeStamp: date })
  }

  updateActive(value: boolean) {
    this.itemSvc.updateItem(this.item.$key, { active: value })
  }

  deleteItem() {
    this.itemSvc.deleteItem(this.item.$key)
  }

}
Step 6: Building a Form to Add Data
The item form component is another child of item-list that handles adding new tasks to the list. It creates a new instance of the Item class and binds its title attribute to the form input using the ngModel directive.
Form Validation
There are several different form validation methods in Angular. In this example, I am going to take advantage of the if-then-else else syntax introduced in Angular 4. This allows us to use a ng-template for valid forms and another for errors.
<input placeholder="Item Title" class="form-control"
[(ngModel)]="item.title"
required minlength="2" maxlength="23"
#title='ngModel' autofocus>
<div *ngIf="title.dirty">
  <span *ngIf='title.errors; then errors else valid'>template renders here...</span>
</div>

<button class="btn btn-primary" (click)='createItem()' [disabled]="!title.valid">Create</button>
<ng-template #valid>
<p class="text-success">looks good!
</ng-template>

<ng-template #errors>
<p class="text-danger">form contains errors!
</ng-template>
Now we can add the item to the database by using the createItem function defined in the service.
export class ItemFormComponent {

  item: Item = new Item();

  constructor(private itemSvc: ItemService) { }

  createItem() {
    this.itemSvc.createItem(this.item)
    this.item = new Item() // reset item
  }
}
That wraps it up. You now have the basic CRUD app with Angular 4 that can be infinitely scaled with Firebase.