
Role Based Authorization With Firestore
Learn more about data modeling in Firestore in the full course.
In this lesson, I will show you how to assign roles to users with the Firestore NoSQL database, then secure them on both the frontend and backend. This feature is known as role-based access control and is commonly used in forums, social media, etc - Stack Overflow Privileges is an excellent specimen of this feature in the wild (minus the ranking system). Keep in mind, there are many different ways to implement role-based authorization - I am sharing an approach that offers a high degree of flexibility, but may need to be customized to fit the needs of your application.
Roles vs. Abilities
This tutorial manages access control with roles and abilities. For example, the admin role canDelete a post.
- Roles are assigned to a user.
- Abilities are assigned to a role.
Do not skip the section that covers backend Firestore database rules, as this is the only way to truly protect your data. Frontend security is great for the user experience, but does not provide *real* security.
Role-based auth demo
Firebase Authentication Setup
If you’re brand new to Firebase authentication, I recommend checking out Episode 55 OAuth with Firestore first. We are going to build directly on that lesson with some additional logic to assign user’s roles.
Core Module
For this demo I have created a core module. It contains all of the user authentication and authorization code.
ng g module core
ng g service core/auth -m core
ng g interface core/user
Don't forget to add the `CoreModule` to the imports section of app.module.ts.
User and Roles Interfaces
We have an interface for the User and another for Roles. Every role is represented with a boolean value and a user can have multiple roles. Maintaining multiple roles makes it easy to customize their abilities in complex ways.
export interface Roles {
    subscriber?: boolean;
    editor?: boolean;
    admin?: boolean;
 }

export interface User {
    uid: string;
    email: string;
    roles: Roles;
}
Auth Service for Firestore
The auth service keeps track of the logged-in user’s document in Firestore. I’m not going to explain this code, but go here if you want a detailed breakdown of the Firestore auth service.
import { Injectable } from '@angular/core';
import { Router } from '@angular/router';
import * as firebase from 'firebase/app';
import { AngularFireAuth } from 'angularfire2/auth';
import { AngularFirestore, AngularFirestoreDocument } from 'angularfire2/firestore';
import { Observable } from 'rxjs/Observable';
import { switchMap } from 'rxjs/operators';
import { User } from './user';

@Injectable()
export class AuthService {

  user$: Observable<User>;

  constructor(private afAuth: AngularFireAuth,
              private afs: AngularFirestore,
              private router: Router) {
      //// Get auth data, then get firestore user document || null
      this.user$ = this.afAuth.authState
        .switchMap(user => {
          if (user) {
            return this.afs.doc<User>(`users/${user.uid}`).valueChanges()
          } else {
            return Observable.of(null)
          }
        })
  }


    ///// Login/Signup //////

  googleLogin() {
    const provider = new firebase.auth.GoogleAuthProvider()
    return this.oAuthLogin(provider);
  }

  private oAuthLogin(provider) {
    return this.afAuth.signInWithPopup(provider)
      .then((credential) => {
        this.updateUserData(credential.user)
      })
  }

  signOut() {
    this.afAuth.signOut()
  }

  private updateUserData(user) {
    // Sets user data to firestore on login
    const userRef: AngularFirestoreDocument<any> = this.afs.doc(`users/${user.uid}`);
    const data: User = {
      uid: user.uid,
      email: user.email,
      roles: {
        subscriber: true
      }
    }
    return userRef.set(data, { merge: true })
  }
}
Backend Security
Backend security is the single most important part of this tutorial. Firestore security rules provide the only guaranteed mechanism to ensure your data cannot be accessed by unauthorized users.
You will likely need to repeat your role-based security rules frequently, which will get out-of-control in a hurry. Thankfully, Firestore allows us to write reusable rule functions to keep our code expressive.
Rules for Any Document
The rules outlined below will fetch the user document and check the value of a given role. This function makes it easy to write rules by saying hasRole('admin') == true, as opposed to writing out the entire path for each rule.
match /posts/{document} {

  function getRole(role) {
    return get(/databases/$(database)/documents/users/$(request.auth.uid)).data.roles[role]
  }

  allow read: if getRole('subscriber') == true;
  allow update: if getRole('editor') == true;
  allow create, delete: if getRole('admin') == true;

}
Rules for the User Document
It’s also important that we define rules on the user document to prevent a user from giving themselves an unauthorized role. We still want the user to be able to customize data on their document, unless it involves changing a role. The following rule will allow the user to write the subscriber role on create, but only admins can update the document with the editor or admin role.
The request.resource.data allows you to check the incoming data and enforce rules against it.
match /users/{document} {

  function getRole(role) {
    return get(/databases/$(database)/documents/users/$(request.auth.uid)).data.roles[role]
  }

  allow read;
  allow create: if request.resource.data.roles.keys().hasAny(['admin', 'editor']) == false;
  allow update: if getRole('admin') == true;
}

Role-based Firestore Rules
Also see the Firestore Security Rules Cookbook.
Defining Authorization Rules
Now let’s jump back to the auth.service.ts file and write some authorization rules. In my opinion, it is best to write activity-based rules, then assign roles to them. For example, we have three rules below canRead, canEdit, and canDelete - pretty self-explanatory.
Each method has a static array of authorized roles, then the checkAuthorization helper will see if any of those roles exist on the user document. You might consider extracting this logic to it’s own class if the complexity becomes hard to maintain.
  ///// Role-based Authorization //////

  canRead(user: User): boolean {
    const allowed = ['admin', 'editor', 'subscriber']
    return this.checkAuthorization(user, allowed)
  }

  canEdit(user: User): boolean {
    const allowed = ['admin', 'editor']
    return this.checkAuthorization(user, allowed)
  }

  canDelete(user: User): boolean {
    const allowed = ['admin']
    return this.checkAuthorization(user, allowed)
  }


  // determines if user has matching role
  private checkAuthorization(user: User, allowedRoles: string[]): boolean {
    if (!user) return false
    for (const role of allowedRoles) {
      if ( user.roles[role] ) {
        return true
      }
    }
    return false
  }
Enforcing Roles in a Component
The authorization rules expect a plain user object, which allows you to use them in the component’s template or typescript. The easiest way to enforce an ability is to remove it’s corresponding UI element from the DOM.
<button *ngIf="auth.canEdit(user)"
        (click)="editPost()">

  Edit Post
</button>
But you can also subscribe to the current user and prevent certain actions from being executed.
  user: User;

  ngOnInit() {
    this.auth.user$.subscribe(user => this.user = user)
  }

  editPost() {
    if(this.auth.canEdit(this.user)) {
      this.postRef.update({ title: 'Edited Title!'})
    }
    else {
      console.error('you are not allowed to do that!')
    }

  }
Securing Routes
ng g guard core/can-read -m core
ng g guard core/admin -m core
An easier approach is to block unauthorized users at the router level. In this case, we are going to create two different router guards in Angular - one for a specific role and one for a specific ability. The idea is to…
- Activate routes only for users with the
adminrole. - Activate routes only for users roles assigned to the
canReadability.
Role-based auth demo
Admin Guard
The guard works by taking the user Observable and mapping it to a boolean. If the user is not logged in or does not have the admin role, it will evaluate to false and block the route.
import { Injectable } from '@angular/core';
import { CanActivate, ActivatedRouteSnapshot, RouterStateSnapshot } from '@angular/router';
import { Observable } from 'rxjs/Observable';
import { AuthService } from './auth.service';
import { tap, map, take } from 'rxjs/operators';

@Injectable()
export class AdminGuard implements CanActivate {

  constructor(private auth: AuthService) {}

  canActivate(
    next: ActivatedRouteSnapshot,
    state: RouterStateSnapshot): Observable<boolean> {

    return this.auth.user$.pipe(
      take(1),
      map(user => user && user.roles.admin ? true : false),
      tap(isAdmin => {
        if (!isAdmin) {
          console.error('Access denied - Admins only')
        }
      })
    );

  }
}
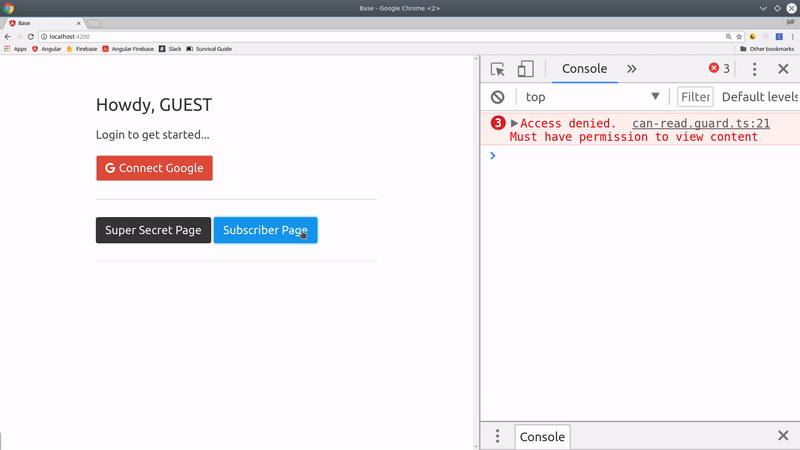
Can Read Guard
The cool thing about this system is that we can activate routes for multiple roles in a single guard. Using the exact same code from the AdminGuard, we just use the canRead helper from the auth service, which will capture all roles with this ability.
// ...omitted

@Injectable()
export class CanReadGuard implements CanActivate {

  constructor(private auth: AuthService) {}

  canActivate(
    next: ActivatedRouteSnapshot,
    state: RouterStateSnapshot): Observable<boolean> {

    return this.auth.user$.pipe(
      take(1),
      map(user => user && this.auth.canRead(user) ? true : false), // <-- important line
      tap(canView => {
        if (!canView) {
          console.error('Access denied. Must have permission to view content')
        }
      })
    );
  }
}
The End
Role-based security often requires a specialized implementation molded to the needs of the underlying product. My goal today was to provide a flexible solution that gives you a foundation for building complex access control features with Angular and Firebase. Let me know if you have questions in the comments or on Slack.