
Top Ten RxJS Concepts
RxJS is one of the most difficult JavaScript libraries to learn, but also one of the most rewarding. The following lesson covers the concepts I consider most important to master, while avoiding common pitfalls.
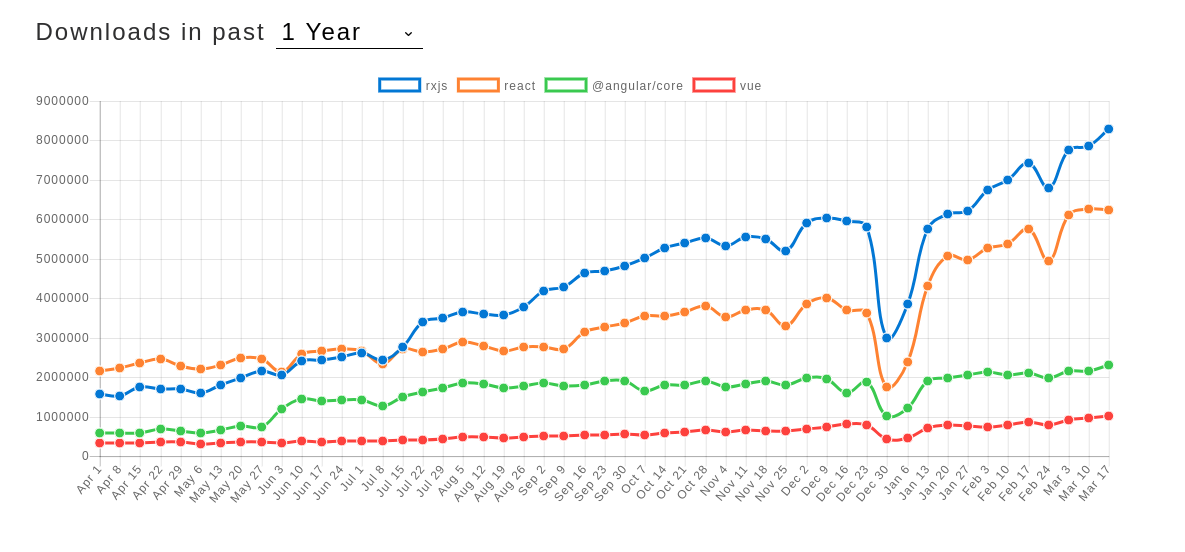
RxJS is one of the most popular functional JS libraries as of 2019, generating more NPM downloads than the big-three UI frameworks and continuing to grow fast
In this lesson, I am going to teach you RxJS (Reactive Extensions for JavaScript) basics in 20 simple steps. My goal is to boil down complex RxJS concepts into the bare essentials. We’re not going to cover every single operator and class - only the most commonly used ones. It is going to be a lot easier to learn than you might think.
1. What is RxJS?
There are different ways to think about RxJS depending on your background. To me, RxJs is …
… a utility for handling asynchronous data streams.
… just like functional vanilla JavaScript in many ways, but with the dimension of time added.
… like a Promise that can resolve over and over again.
I like to think of RxJS terminology in a highly simplified way.
- Observable - An array that is built over time.
- Subscription - A for loop that happens over time.
- Emit - When an Observable spits out a value because something subscribed to it.
- Operator - Functions that alter the the way Observables emit values.
Excellent Resources
2. Create Observables - Define the stream
There are many ways to create Observables. Remember, a stream can be anything. The most fundamental method is create(), which allows you to emit values to the subscriber by calling next() in the function.
const observable = Rx.Observable.create( observer => {
    observer.next( 'hello' )
    observer.next( 'world' )
})

observable.subscribe(val => console.log(val))
// hello
// world
That’s neat, but RxJS has some powerful helpers that allow us to create observables automatically.
Observable from DOM Events
Let’s create an observable from mouse clicks.
const clicks = Rx.Observable.fromEvent(document, 'click')

clicks.subscribe(click => console.log(click))
// click around the web page...
// MouseEvent<data>
// MouseEvent<data>
Observable from Promise
Many JavaScript libraries deal in Promises, which could pose an issue. Luckily, you can easily convert a promise to an observable with fromPromise().
const promise = new Promise((resolve, reject) => {
    setTimeout(() => {
        resolve('resolved!')
    }, 1000)
});


const obsvPromise = Rx.Observable.fromPromise(promise)

obsvPromise.subscribe(result => console.log(result) )

// wail 1 second...
// resolved!
You can also convert an observable right back to a promise using the `toPromise()` method.
Observable Timer
You can set timers. It completes when the timer runs out.
const timer = Rx.Observable.timer(1000)

timer.subscribe(done => console.log('ding!!!'))
Observable Time Interval
You can tell an observable to emit something for every interval.
const interval = Rx.Observable.interval(1000)

interval.subscribe(i => console.log( i ))
// 0
// 1
// every second for eternity...
Observable of Static Values
Lastly, we are going to create an observable from some static values. It completes immediately after emitting its values.
const mashup = Rx.Observable.of('anything', ['you', 'want'], 23, true, {cool: 'stuff'})

mashup.subscribe(val => console.log( val ))
// anything
// you,want
// 23
// true
// [object Object]
3. Unsubscribe - Turn off the stream
When an Observable is done, it emits a complete notification.
You need to know when your Observable completes, otherwise your streams might flood the available memory in your app. If you have a continuous stream, you need to shut it off at some point.
Some observables complete automatically, so there is no need to unsubscribe (but it doesn’t hurt if you do). You can find out if an observable is complete by calling finally(). For example at timer.
const timer = Rx.Observable.timer(1000);

timer
  .finally(() => console.log('All done!'))
  .subscribe()
// wait 1 second...
// All done!
Others will run forever, such as interval…
const interval = Rx.Observable.interval(1000);
interval
  .finally(()  => console.log('All done!'))
  .subscribe(x => console.log(x))
// 0
// 1
// and so on...
You can turn them off by keeping the subscription in its own variable, then calling unsubscribe().You can also complete Observables with operators as we will see later.
const subscription = interval.subscribe()

subscription.unsubscribe()
// 'All Done'
4. Hot vs Cold Observables
This is somewhat confusing topic that should be really simple. Check out Ben Lesh’s post on Hot vs. Cold Observables on Medium
- Cold Observables start emitting or creating values only when the subscription starts, like a typical YouTube video. Each subscriber will see the same sequence (or pattern) of events from start to finish.
- Hot Observables are always being updated with new values, like a live stream on YouTube. When you subscribe you start with the most recent value and only see future changes.
Cold Observable Example
We know an Observable is cold if we subscribe at the same time, but get a different value.
const cold = Rx.Observable.create( (observer) => {
    observer.next( Math.random() )
});

cold.subscribe(a => console.log(`Subscriber A: ${a}`))
cold.subscribe(b => console.log(`Subscriber B: ${b}`))


// Subscriber A: 0.2298339030
// Subscriber B: 0.9720023832
They both subscribed to the same Observable with different results. This happens because the cold Observable doesn’t generate the random number until after the subscription starts.
Hot Observable Example
A hot observable gets its values from an outside source. We can make it hot by simply moving the random number outside of the observable creation function.
const x = Math.random()

const hot = Rx.Observable.create( observer => {
  observer.next( x )
});

hot.subscribe(a => console.log(`Subscriber A: ${a}`))
hot.subscribe(b => console.log(`Subscriber B: ${b}`))
// Subscriber A: 0.312580103
// Subscriber B: 0.312580103
But how do we make an already cold observable hot? We can make a cold Observable hot by simply calling publish() on it. This will allow the subscribers to share the same values in realtime. To make it start emitting values, you call connect() after the subscription has started.
const cold = Rx.Observable.create( (observer) => {
    observer.next( Math.random() )
})

const hot = cold.publish()

hot.subscribe(a => console.log(`Subscriber A: {a}`))
hot.subscribe(b => console.log(`Subscriber B: {b}`))


hot.connect()

/// Subscriber A: 0.7122882102
/// Subscriber B: 0.7122882102
5. Map - Control the Emitted Values
The single most powerful RxJS operator is map. It allows you to modify the emitted values based any logic you desire. It’s the chef’s knife of RxJS operators - you will use it often.
Here we have an observable of numbers, let’s map them to their logarithm.
const numbers = Rx.Observable.from([10, 100, 1000]);

numbers
  .map(num => Math.log(num) )
  .subscribe(x => console.log(x))
  // 2.3
  // 4.6
  // 6.9
Another common use of map is converting a JSON response from an API to a JavaScript object.
apiCall
  .map(json => JSON.parse(json) )
  .subscribe()

// emit as JS object, rather than useless JSON string
Similar operators: mapTo
6. Do - Just do it
The do operator allows you to run code at any point in the Observable, without producing side effects on the emitted values. This is handy for debugging or for any situation where you want to run code outside of the Observable scope.
const names = Rx.Observable.of('Simon', 'Garfunkle')

names
  .do(name  => console.log('original value', name) )
  .map(name => name.toUpperCase() )
  .do(name  => console.log('uppercase value', name) )
  .subscribe()
  // Simon
  // SIMON
  // Garfunkle
  // GARFUNKLE
7. Filter - Use only the Good Stuff
Filter will only emit values if they meet a certain condition. Let’s say we have an Observable of tweets, but only want to show tweets from a certain user.
const tweet = Rx.Observable.of(arrayOfTweetObjects)

tweet
  .filter(tweet => tweet.user == '@angularfirebase' )
  .subscribe()
8. First, Last - When the order counts
There are times when you might only care about the first or last element of an Observable.
const names = Rx.Observable.of('Richard', 'Erlich', 'Dinesh', 'Gilfoyle')

names
  .first()
  .subscribe( n => console.log(n) )
// Richard


names
  .last()
  .subscribe( n => console.log(n) )
// Gilfoyle
9. Debounce and Throttle - Handle Stream Overload
Sometimes you might be dealing with a stream that that is emitting values crazy fast - such as mouse move events in the browser. You might only want to handle these events every so often.
- Throttle - Give me the first value, then wait X time.
- Debounce - Wait X time, then give me the last value.
const mouseEvents = Rx.Observable.fromEvent(document, 'mousemove')

mouseEvents
  .throttleTime(1000)
  .subscribe()
// MouseEvent<data>
// wait 1 second...


mouseEvents
  .debounceTime(1000)
  .subscribe()
// wait 1 second...
// MouseEvent<data>
10. Scan - Keep a Running Total
Scan sounds scary, but works just like reduce for Arrays in JavaScript. It keeps track of the accumulated total of emitted values, so you can combine the emitted values from an observable together.
Let’s imagine you’re building a game that records a high score. We can simulate this with mouse clicks and assign a random score to each click.
const clicks = Rx.Observable.fromEvent(document, 'click')

clicks
  .map(e => Math.random() * 100 )
  .scan((totalScore, current) => totalScore + current)
  .subscribe()
The result is a high score that increases after each click.
Scan is a great tool for the Redux pattern when combining states. think `scan( (current, new) => {...current, ...new } )`
Learn more about using Redux with Angular.
11. SwitchMap - Get value from Observable A, then emit Observable B
switchMap is commonly required when dealing with async data from a database or API call. For example, you need to get a user ID from an observable, then use it to query the database. In this example, we reset an interval after each mouse click.
const clicks = Rx.Observable.fromEvent(document, 'click')


clicks.switchMap(click => {
    return Rx.Observable.interval(500)
})
.subscribe(i => print(i))
RxJS also provides similar operators mergeMap and concatMap, which have subtle differences, but switchMap is generally considered the best default for this type of behavior.
12. TakeUntil - Get values until you’re told not to
As I mentioned in section 3, you need to unsubscribe for data responsibily. A clever way to handle subscriptions is with takeUntil(), which will complete the Observable when a second notifier Observable emits a value.
const interval = Rx.Observable.interval(500)
const notifier = Rx.Observable.timer(2000)


interval
  .takeUntil(notifier)
  .finally(()  => print('Complete!'))
  .subscribe(i => print(i))
// 0
// 1
// 2
// Complete!
13. TakeWhile - Get values while the conditions are right
The takeWhile() operator will complete the observable when a certain condintion is is true. It’s like going speed dating until you find the perfect matching partner.
const names = Rx.Observable.of('Sharon', 'Sue', 'Sally', 'Steve')

names
  .takeWhile(name => name != 'Sally')
  .finally(()  => console.log('Complete! I found Sally'))
  .subscribe(i => console.log(i))
14. Buffer - Collect values, then emit as Array
Buffer is similar to debounce and throttle, but rather than filtering out data, it accumulates it into an array, then emits the array. There are many ways to buffer, but here we are going to use bufferTime() and bufferCount(), to buffer based on time or quantity.
const mouseEvents = Rx.Observable.fromEvent(document, 'mousemove')

mouseEvents
  .map(e => e.timeStamp.toFixed(0))
  .bufferTime(1000)
  .subscribe(batch => print(batch))
  // second 1 - [...values]
  // second 2 - [...values]

mouseEvents
  .bufferCount(5)
  .subscribe(batch => print(batch))
  // [...values] length 5
  // [...values] length 5
15. Zip - Combine in unison
Zip works well when you have complimentary Observables that you know have an equal number of values. It will combine the values by index location and emit them as a combined array.
const yin   = Rx.Observable.of('peanut butter', 'wine','rainbows')
const yang  = Rx.Observable.of('jelly', 'cheese', 'unicorns')

const combo = Rx.Observable.zip(yin, yang)

combo.subscribe( arr => console.log(arr) )
// peanut butter, jelly
// wine, cheese
// rainbows, unicorns
16. ForkJoin - Merge, wait for completion, emit last values together
I think people like forkJoin() because of it’s cool name, but it seems to confuse people and shows up on StackOverflow way more than it should. It’s similar to zip(), but it waits for all observables to complete then emits only the last values together.
let yin   = Rx.Observable.of('peanut butter', 'wine','rainbows')
let yang  = Rx.Observable.of('jelly', 'cheese', 'unicorns')

yang = yang.delay(2000)

const combo = Rx.Observable.forkJoin(yin, yang)

combo.subscribe( arr => console.log(arr) )
// wait 2 seconds...
// rainbows, unicorns
The `forkJoin()` operator is commonly used to combine multiple Promises that must all be resolved before sending data to the UI.
17. Catch - Handle errors gracefully
We can’t forget to catch errors. Naturally, RxJS has a catch() operator for just that purpose. It will
const observable = Rx.Observable.create( observer => {
    observer.next( 'good' )
    observer.next( 'great' )
    observer.next( 'grand' )

    throw 'catch me!'

    observer.next( 'wonderful' )
})


observable
    .catch( err => print(`Error caught: ${err}`) )
    .subscribe( val => console.log(val) )
// good
// great
// grand
// Error caught: catch me!
18. Retry - Never give up
Let’s say we get an error from an API on the initial request - it might just be a fluke. Let’s give it a couple more tries before we give up and complete the Observable.
The basic retry() operator will try right away as many times as you want.
observable
    .catch( err => print(`Error caught: ${err}`) )
    .retry(2)
    .subscribe()
You can also use the retryWhen() operator to add some sophistication to a retry.
observable
    .catch( err => print(`Error caught: ${err}`) )
    .retryWhen(err => err.message === 'server overload please try again' )
    .subscribe()
19. Subject - An Observable that talks to subscribers
An RxJS Subject is just an Observable with the ability to call next() on itself to emit new values - in other words, it is an event emitter.
const subject = new Rx.Subject()

const subA = subject.subscribe( val => print(`Sub A: ${val}`) )
const subB = subject.subscribe( val => print(`Sub B: ${val}`) )

subject.next('Hello')


setTimeout(() => {
    subject.next('World')
}, 1000)

// Sub A: Hello
// Sub B: Hello
// Sub A: World
// Sub B: World
20. MultiCast - Share values, not side effects
Subjects allow you broadcast values from a shared source, while limiting side effects to only one occurrence. You start with a regular Observable, then multicast it to a Subject to be consumed by the end user. This magic happens because a single shared subscription is created to the underlying observable.
const observable = Rx.Observable.fromEvent(document, 'click');

const clicks = observable
                 .do( _ => print('SIDE EFFECT!!') )

const subject = clicks.multicast(() => new Rx.Subject() );

const subA = subject.subscribe( c => print(`Sub A: ${c.timeStamp}`) )
const subB = subject.subscribe( c => print(`Sub B: ${c.timeStamp}`) )

subject.connect();
// SIDE EFFECT!!
// Sub A: 2687.62
// Sub B: 2687.62

// SIDE EFFECT!!
// Sub A: 4295.11
// Sub B: 4295.11